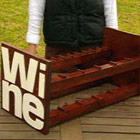
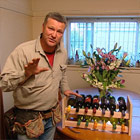
Scott Cam built a simple rack to hold 12 wine bottles, 6 on the top shelf and 6 on the bottom shelf. This easy and inexpensive project was only about one hour’s work for Scottie. He chose maple for his wine rack, but you could use whatever timber you wish.
Once the wine rack was complete, Rita Hill added the finishing touches.
Materials
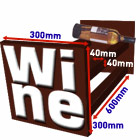
- 2 x maple end pieces (19 x 285 x 300mm)
- 4 x maple supports (40 x 40 x 600mm)
- 34 x maple moulding chocks (9 x 9 x 40mm)
- 1 x 50 piece pkt brass wood screws counter sunk 8 gauge x 32mm
- 1 x pkt bullet nails, 15mm
- 1 x 250ml PVA adhesive glue
- 1 x 200ml Wattle Wood Gel (we used Western Jarrah)
- 1 x MDF sheet (3 x 900 x 600mm)
- Acrylic paint (whatever colour you like)
- 1 x 500ml Wattle Estapol Gloss
Step by step instructions
- Cut 2 pieces of 19mm x 285mm maple to match the length of a wine bottle (300mm). These will be the ends of your wine rack. Cut 4 x 600mm lengths of the 40mm x 40mm maple. These will be your supports. (Tip: to save time, have the timber pre-cut to length.)
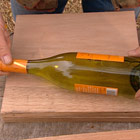
- Lay the end pieces flat and position the wine bottle on the timber, keeping the bottle at a slight slant so that when it sits on the rack the cork always stays wet.
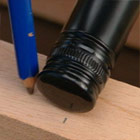
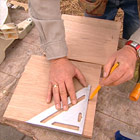
- Using a carpenter’s pencil, mark out where you want the supports to go, making sure you mark out both sides of the bottle. Use a triangle square to check your positions.
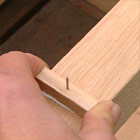
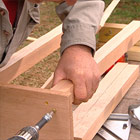
- Using these marks, pre-drill all your screw holes.
- Lightly sand all your timber pieces with a fine sanding sponge until all the edges are smooth.
- Insert your brass screws into the pre-drilled holes on the end pieces. Attach the supports to the end pieces. Sand the outside of the end pieces to smooth out the drill holes.
Rita’s finishing touches
- Cut the chocks to the same width as the supports (40mm). Measure out 40mm intervals along the 9 x 9mm maple moulding then use a mitre box to make your cuts uniform and square. Sand off the rough edges.
- Measure and mark out 100mm intervals for the back chocks. Glue and nail into position. (Tip: nailing the chocks is easier if you tap each nail in first, just to get it started). Wipe off any excess PVA glue. Use the neck of a wine bottle as a guide to help you space the front chocks, then nail and glue them into position.
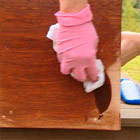
- Stain the rack in the colour of your choice. (Rita used Wattle Wood Gel ‘Western Jarrah’.) Allow to dry thoroughly.
- Using spray adhesive, stick the page of letters to some 3mm MDF. Cut the letters out using a jigsaw, and then peel the paper off.
- Paint the letters with acrylic paint. When dry, lay the letters out and stick them down with PVA glue.
- Finally, give the whole wine rack a coat of varnish, such as Wattle Estapol Gloss.
Cost and availability
- 19mm x 290mm maple for end pieces, $29.90 per metre
- 42mm x42mm maple for cross pieces, $6.40 per metre
- 9mmx9mm maple moulding for chocks, $5.45 per metre
- Wattle Wood Gel, colour Western Jarrah, around $8.75
- 3mm thick 900mm x 600mm sheet of MDF, $3.30
- Wattle Estapol Gloss, $8.40 for 250 mls
The materials listed above are all available from hardware stores.
Win-Win
For details on how to win the wine rack and wine, see the Win-Win fact sheet.