
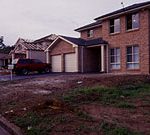


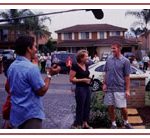


Mark and Penny Horsnell had a dream of a beautiful four bedroom home on a quarter acre site. They both worked hard to turn the dream into a reality and recently finished building their wonderful new home. But Mark and Penny had no garden at all. The Blitz team decided to take on their first street-front makeover. Penny was in on the secret – Mark got the surprise of his life.
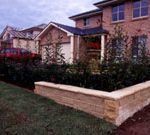
The plan was for a structural garden with formal lines, a circular garden bed with an urn on a pedestal, a brand new brick pier letterbox, screening and hedging plants, and lawn to complement their beautiful home.
What we did
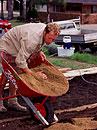
We built a retaining wall along the side boundary, rotary hoed the soil to aerate and loosen it, brought in new topsoil with organic matter, built a raised circular garden bed in the middle of the front yard complete with an urn on a pedestal. A brick pier was built to house the letterbox, screening and hedging plants were planted around the borders of the garden and turf was laid.
Materials
Retaining wall: handy wall retaining wall system, road base, masonry adhesive, geotextile, blue metal, ag. pipe. Tools: string line, spray marker paint, shovel, spirit level.
Letterbox pier: brass fronted letterbox, brass paper moulding, sandstone coloured bricks, sandstone coping, brickie’s sand, cement, 50×50 reinforcing mesh, premixed concrete. Tools: string line, spirit level, shovel, brickie’s trowel, wheelbarrow.
Circular garden bed: reconstituted sandstone pond edging, reconstituted sandstone pedestal and urn, paving sand, garden mix, 100×25 treated pine garden edging, 300mm treated pine pegs, galvanised nails. Tools: shovel, tape measure, spray marker paint, saw.
Garden beds and lawn: plants (see list below), 100x25mm treated pine garden edging, 300mm treated pine pegs, organic garden mix, galvanised nails, organic mulch (eg composted bark). Tools: shovel, lawn roller, garden hose, saw.
Adapting this plan to your garden
Make a detailed scale drawing of your backyard (eg 1:100) showing the location of the house and major features then incorporate the desired elements from our makeover. As your garden will be a different size you will need to estimate the amounts of materials you will require.
Note: On your plan show the locations of any services (water pipes, sewerage, power, phone etc) so you can avoid damaging them during the makeover. To find the location of services phone 1100.
Step-by-step
Retaining wall
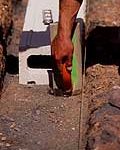
We built a low retaining wall around the garden using a kit-style retaining wall system (Handy Wall by Amber Tiles). Such systems are easy to assemble. A drainage pipe was installed behind the wall and connected into the existing drainage system at the nearest point.
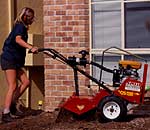
Step 1 Mark out the position of the retaining wall using spray marker paint, excavate the footing to a width of 600mm and depth of 300mm, and fill the footing with road base to a depth of 150mm. Smooth the road base and compact with a vibrating plate compactor.
Blitz Tipz: Use a spirit level to ensure the footing is completely level. If you start off level – you’ll finish level.
Step 2 Set up a string line to find the position of the first course of the retaining wall. Carefully lay the blocks in position following the manufacturer’s recommendations. A masonry adhesive should be used to secure the coping stones.
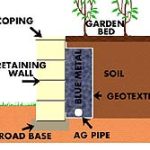
Step 3 Lay geotextile fabric along the inside of the retaining wall covering the bottom and exposed soil face. Lay the ag pipe along the bottom (on top of the geotextile) and connect to the drainage system. Fill with blue metal to 200mm below the top of the wall. Fold the geotextile over the top of the blue metal and completely fill with top soil (see diagram).
Circular garden
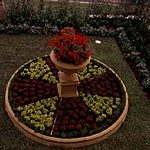
A circular garden bed with a large urn on a pedestal in the middle is the centrepiece of the garden. Reconstituted sandstone pond edging was used to make the garden edge. Treated pine garden edging was used to divide the circular garden into eight segments (like spokes of a wheel) and a pedestal in the centre supported a large urn planted with red salvia.
Step 1 Mark out the position of the garden bed with spray marker paint. To draw a circle, drive a wooden peg in the centre of the circle with a nail in the top. Attach a tape measure to the nail and at the correct distance from the centre and scribe a circle.
Blitz Tipz: Be careful not to stretch the tape while marking out the circle.
Step 2 Excavate a footing for the edging down to 300mm and fill with 150mm of paving sand, smooth and compact.
Step 3 Lay the edging using the tape measure to ensure it is in the right position. Once the circle is complete top soil can be used to fill in around the base.
Step 4 Remove the centre peg and excavate a footing for the pedestal down to 300mm. Fill with paving sand to a depth of 150mm, level and compact. Put the pedestal into position and place the urn on top.
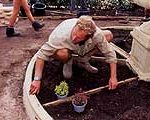
Step 5 Divide the circular bed into 8 equal segments and mark out with spray marker paint. Excavate the lines, drive treated pine pegs at 1m intervals along the lines and nail treated pine garden edging into place. Fill each segment and the urn with organic garden mix and plant.
Blitz Tipz: Water plants well after planting.
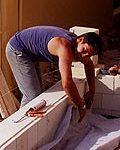
Letterbox Pier
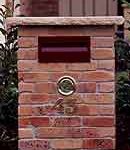
Reconstituted sandstone bricks with a sandstone coping were used to make a letterbox pier 13 bricks high and 3 bricks wide. It has a lockable letterbox and a 100mm diameter PVC tube (with brass front plate) for newspapers.
Step 1 Mark out the position of the letterbox pier, excavate a footing to a depth of 200mm. Premixed concrete can be prepared in a wheelbarrow by adding water. Pour a layer of concrete in the hole, lay the reinforcing mesh next and cover with concrete. The pad should be 150mm thick. Screed to smooth and check for level with a spirit level. Leave to set overnight.
Blitz Tipz: A length of timber can be used as a screed and should be used in a sawing motion.
Step 2 Mix a bucket of mortar (4:1 mix of brickie’s sand and cement) and lay a 10mm mortar bed over the concrete footing. Position the first course of bricks (with 10mm of mortar between) on the bed and use a spirit level to ensure the course is perfectly level.
Blitz Tipz: In areas with hard water add a couple of capfuls of Bycol to the water before mixing the mortar. This results in a fluffier and stickier mortar.
Step 3 Continue laying each course, offsetting the joins of each course from the previous by alternating between 3 bricks lengthways and 2 lengthways/2 crossways. The paper holder and letterbox can be put into position as you go.
Blitz Tipz: There should be 10mm of mortar in the joints between the bricks, tap the bricks into position using the handle of the trowel.
Step 4 Lay a 10mm mortar bed for the sandstone cap, lower the cap into position and level with a spirit level. Use a stiff brush to tidy up the brickwork removing any excess mortar from the bricks and giving it a uniform finish. The mortar should be allowed to set overnight before resuming work in the area.
Garden edging
Level the site and mark out the lines for the garden edging using spray marker paint. Excavate along the lines to a depth of 100mm, drive pegs at 1m intervals and nail the edging to the pegs.
Beds Plant the garden keeping plants at the same depth as they were in their containers. Mulch with a 50mm layer of organic mulch (eg composted bark) over the entire garden and water thoroughly.
Turf Use a rake or topsoil leveller to level the area. It may be necessary to excavate if too high, or add organic garden mix if too low. Lay out the turf, cutting to shape with hedge shears, roll and water.
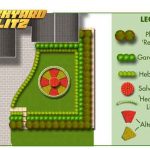
Our plants: photinia (Photinia x fraseri ‘Red Robin’); dwarf lilly pilly (Acmena smithii ‘Hedgemaster’); gardenia (Gardenia augusta ‘Magnifica’); red and green alternanthera; hebe (Hebe ‘Wiri Joy’), Philodendron ‘Xanadu’; salvia ‘Bonfire’. Turf: Buffalo ‘Sir Walter’.
photinia
dwarf lilly pilly
gardenia
alternanthera
hebe
salvia
Buffalo ‘Sir Walter’
Cost and availability
We used mature plants to create an instant effect for television. Our total cost of plants and materials was $9622. Savings are possible using smaller plants ($7941). Plants are available at nurseries or can be ordered in. Most other materials are available from large hardware stores, landscape suppliers or garden centres. For retaining wall systems look under ‘Retaining Walls’ in your Yellow Pages. The ‘Handy Wall’ system we used is available through Amber Tiles (phone 1300 362 241 for more information). The vibrating plate compactor and most of the other tools required are available for hire.
Design by John Happ, 3rd Dimension Designs, phone: (02) 9744 2658. Construction by the Blitz Team.
For the Revisiting Old Friends fact sheet click here.