


Spanish Influence
It’s not often that we’re asked to do a makeover for someone’s motherin-law but that’s exactly why Scott Roberts wrote to us. His mother-inlaw, Judith Gavan, suffers from rheumatoid arthritis which makes the use of her hands both difficult and painful. Scott asked us to surprise Judith with a beautiful, low-maintenance garden which she could easily look after. With Scott’s help we sent Judith and a friend to her sister’s for couple of days, giving us time to create a garden with a distinct Spanish influence.
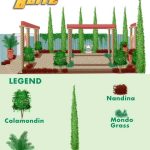
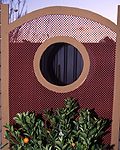
Garden designer Colin Brown’s plan was for a low-maintenance garden reminiscent of the outdoor entertainment area of a Spanish hacienda. It has beautiful Spanish columns and an overhead pergola and a planting of bush calamondins (similar to cumquats) in urns, arum lilies and wallmounted terracotta pots of kalanchoe. The focal point is a Spanish fountain with hand painted tiles. The garden also has a fully automatic watering system (even to the pots) so Judith doesn’t have to lift a finger.
What we did
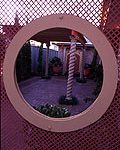
We tidied up the existing garden beds – removing some plants and pruning others. A demolition saw was used to cut into the existing paving, making way for the larger garden beds, the column footings and a contrasting border of pavers. Paving borders were laid around the new garden beds and the pergola. The pergola columns were concreted in, roof beams added and three decorative perforated metal screens were built and mounted around the sides. A fountain was installed as was the automatic irrigation system. Terracotta pots were mounted around the walls, urns were positioned and the revamped garden beds were planted out.
Materials
Paving borders: concrete pavers 390x190x50mm (Bowral Bricks ‘Maple’), brickie’s sand, cement and grouting sand. Tools: demolition saw (alternatively use a brick saw), concrete float, spade, brickie’s trowel, wheelbarrow, straight edge, string line, marker pen, crow bar and broom.
Pergola and screens: pre-cast cement column (Jacobean barley twist design, sandstone coloured 152x2100mm), hyspan laminated beam (LVH3 200x63mm ordered to the required length) with L-shaped bracket and galvanised screws, treated pine timber slats (30x30x2700mm), 25x75mm framing timber, zinc coated perforated sheets (2000x1000mm), A1 waterproof plywood sheets (2400x1200x7mm), reconstituted sandstone rosette, concrete (40kg bags), brickie’s sand, cement, sandstone coloured cement stain, rawl plug (green plug) and 8 gauge screw, galvanised nails, Murowash outdoor acrylic paint (‘Red Earth’ and ‘Arnhem’). Tools: wheelbarrow, post hole shovel, spade, demolition saw (or brick saw), string line, 300mm peg, spirit level, ruler, marker pen, bucket, concrete float, brickie’s trowel, paintbrush, paint stirrer, jig saw, tin snips, screwdrivers, drill, 7mm and 6mm drill bits, ladder and nail gun (or hammer).
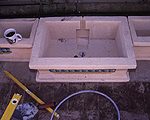
Fountain: fountain (Jardineras tiled water font with side planters), low voltage fountain pump with transformer, low voltage pond light with transformer, low voltage cable, 13mm reinforced hose, hose clips, gel cap connectors, conduit and elbows (20mm), conduit adhesive, brickie’s sand, cement, star pickets (optional), galvanised wire (optional). Tools: electrical screwdriver and pliers, shovel and spirit level, bucket or hose, lump hammer, brickie’s trowel, wheelbarrow, bucket, spirit level and spade.
Mounted containers and urns: 200mm diameter terracotta pots, wall mounting brackets, rawl plugs (green) and screws (8 gauge), urns (Enduca Pot 600mm diameter x 75mm high), potting mix and paint (Murowash ‘Red Earth’). Tools: drill and 7mm bit, marker pen, screwdriver, rag or sponge and bucket.
Plants: (see list below), potting mix and horticultural bark mulch. Tools: spade.
Adapting this plan to your garden
Make a detailed scale drawing of your backyard (eg 1:100) showing the location of the house and major features then incorporate the desired elements from our makeover. As your garden will be a different size you will need to estimate the amounts of materials you will require.
Note: On your plan show the locations of any services (water pipes, sewerage, power, phone, etc) so you can avoid damaging them during the makeover. Dial the ‘Dial before you Dig’ line on 1100 for information.
Blitz Tipz: Your existing house plans are a great place to start when making your site plan.
Step-by-step
Getting started: any rubbish, old structures, paving, weeds, etc should be removed and the site levelled. If your site requires levelling ensure adequate slope away from the house to prevent flooding in heavy rain. If your soil is of poor quality it can be mixed 50:50 with a good organic garden mix. If it is high in clay dig in gypsum or organic clay breaker.
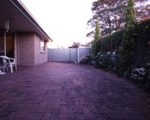
Paving
Some of the existing paving was removed make new garden beds. We also replaced some of the existing paving with dark coloured pavers to make a border around the edges of the pergola and the garden beds. A demolition saw was used to cut the existing paving.
Blitz Tipz: A demolition saw is potentially dangerous in the hands of an inexperienced person. A safer option is a brick saw. If using a brick saw mark the bricks to be cut, remove them, make the cut and return them to their original position.
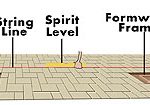
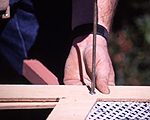
Step 1 Mark the line to be cut in the existing paving using a marker pen and straight edge. When marking out, take the depth of the new border into consideration when marking out the garden beds.
Blitz Tipz: A perfectly straight piece of timber can be used as a straight edge. If your planned cut is several metres long it will pay to set up a string line first to guide the placement of the straight edge as you mark it out.
Step 2 Use a demolition saw to cut along the marked lines, remove the unwanted pavers and excavate a 50mm bed under the area of the new border.
Blitz Tipz: Wear full safety gear and make sure that bystanders and pets are kept well away as this is a very dusty operation.
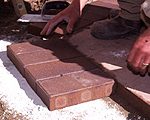
Step 3 Spread a 50mm layer of mortar (4:1 ratio of sand and cement) where the new border is to be laid. Use a concrete float to ensure it is smooth and level. Lay the border pavers ensuring they are at the same height as the existing paving. When paving around corners and angles you will need to use a brick saw to mitre cut the bricks to fit in. Leave the new paving to set overnight.
Blitz Tipz: Use the handle of the trowel or a rubber mallet to tamp the pavers down into position.
Step 4 To grout, spread grouting sand over the paving and sweep in with a broom to fill the gaps.
Blitz Tipz: To ensure the grouting sand is perfectly dry spread it in a thin layer over the paving and allow to bake in the sun for a couple of hours before sweeping it in.
Pergola
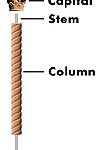
We built a pergola in the centre of the existing paved courtyard using pre-cast concrete columns, L3 beams and treated pine 30x30mm slats on the roof. Four sections of paving were removed to make room for the column footings. Mondo grass borders were planted around the columns. The columns we used come in four pieces: the base, the column shaft, the capital and the top bracket (see diagram). The central shaft of the column extended about 400mm below the level of the base so it could be concreted securely into position. It is important to work out the levels at the start and build the footings accordingly.