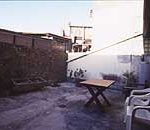
Beauty salon owner Anna Zaccomer, is the typical hard-working mum. She’s got two small kids and a very busy and demanding job. The Blitz Team decided to give her a helping hand by fixing up the courtyard behind her salon. And so it would be a big surprise Anna and her family were sent away for few days while the makeover took place.
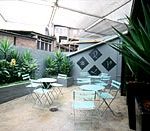


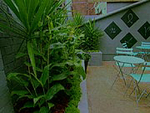


While Anna was away, the team turned the drab courtyard into an inspired garden. Anna’s reaction: “It’s perfect: my clients will love it!”
The plan was to create an area where beauty therapy clients could sit and relax during treatment. Landscape Designer Colin Brown drew up a plan which included movable overhead shade panels, raised planter boxes, reflective wall panels and astrological symbols, a dramatic colour scheme and some fragrant and medicinal plants.
Click to view plan
What we did
Painted existing exterior walls, made two bagged brick planter boxes, erected sliding shade panels and decorated the walls with hand-painted astrological symbols, bronzed reflective panels and crystals. The existing concrete pavement was cleaned and given a new look.
Materials
Paint: Murowash ‘Fossil’; Pascol acrylic ‘Victorian Green’.
Raised garden beds: bricks (Austral dry pressed commons), brickies sand and cement, masonry sealant, plants (see plan), Amgro Pot ‘n’ Peat and composted pine bark mulch. Tools: Brickie’s trowel, spirit level, string lines, plastering hand tool.
Paving: existing concrete. Tools: Gerni (hired), angle grinder, string lines, chalk, tape measure.
Overhead shade panels and reflective wall panels: Bronze Polygal sheets, U-profile end caps, tapes, stainless steel balustrade wire (3mm), shackles, thimbles, swages, rigging screws, Excalibur bolts. Radiata pine and black enamel spray paint for wall panels. Tools: swage tool (hired), drill, saws, spirit level, tape measure.
General tools: tape measure, spirit level, paint brushes, caulking gun.
Adapting this plan to your garden
Make a detailed scale drawing of your courtyard (eg 1:100) showing the location of buildings and major features then incorporate the desired elements from our makeover. As your place will be a different size you will need to estimate the amounts of materials you will require.
On your plan show the locations of any services (water or drain pipes, power or phone cables, meter boxes, etc) so you can plan around them to avoid damage during the makeover.
Permits and approval: council permission is required for some structural work. Neighbours need to be consulted about new boundary fences. If they don’t agree with your proposed fencing idea, you are legally entitled to build your new fence on your own property – eg just on your side of the boundary line.
Step-by-step guide
Getting started: Any rubbish, old structures, paving, weeds, etc should be removed and the site cleaned up. If you are painting walls, clean them up and do any maintenance first. Old, dirty concrete can be cleaned.
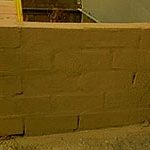
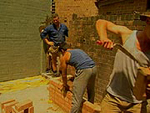
Raised planter beds: We built two 500mm high brick planter beds so the new garden would be at eye level for people who were seated in the courtyard. Extending out from an existing wall, the beds were built directly on the concrete floor. Drainage holes were included (see step 3 below) and the new brick work bagged and painted.
Step 1 Check existing walls and floor are level. If the surroundings are not level you will have to adjust your new work accordingly. Use a string line to mark out the position of the garden bed walls.
Step 2 Form a footing for the bricks with a layer of mortar (4:1 ratio of sand to cement) approximately 75mm deep. Start at one end, working out from the existing wall first.
Step 3 Using a brickies trowel, place mortar on each side of a brick then lay it in position. Continue laying the bricks side by side, tapping them into position with the handle of the trowel. Leave the mortar off one side of every third brick to create a drainage hole. Complete the side you’re working on. Place a spirit level on top of the bricks to ensure they are level, gently tap them down if needed.
Step 4 Complete the front row next, ensuring it is level and flush with the side you laid first, then finally complete the remaining side.
Step 5 Tidy up the mortar footing by removing any excess with the trowel so it is flush with the front of the bricks.
Step 6 Continue laying each layer on the previous with the joins offset from the layer below.
Step 7 The top layer is laid on its edge to finish the top surface. Allow the mortar to set – preferably overnight, however with care you can start working around it within a couple of hours.
Step 8 Paint the inside of the planters with a masonry sealant. Allow to dry before filling the raised beds with potting mix. Blitz Tipz: It takes 62 x 30 litre bags, or 1.5 tonnes of potting mix to fill 1 cubic metre.
Bagging: We gave the garden beds a rough finish with a method called bagging. Bagging also fills any imperfections in the mortar joints.
Step 1 Create a mortar mix the consistency of thick cream (6:1 brickies sand:cement).
Step 2 Wet the entire surface of the brickwork to be bagged (reduces cracking).
Step 3 Use a large sponge to apply the mix to the brickwork. Blitz Tipz: Bagging can be done with a piece of hessian sack to give a rough effect, a sponge for a medium effect or a soft cloth for a smoother effect.
Step 4 Allow the bagging to dry, then paint it (or use Bondcrete).
Paving: The existing concrete was cleaned and then treated to look like paving.
Step 1 Clean the concrete with a Gerni, a high pressure hose used to remove algae and dirt and available for hire.
Step 2 Using string lines and a tape, grid the area into blocks 300x300mm to resemble paving. Mark out in chalk.
Step 3 Use an angle grinder to cut intersecting lines into the concrete following the chalk lines.
Step 4 Rub black grout into the cuts to look like tile grout.
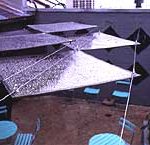
Sliding shade panels: Moveable roof panels give adjustable shade outdoors. Transparent synthetic Polygal panels were suspended over the courtyard on wires and shackles. Note: Polygal is not recommended for use in a horizontal position so the panels were mounted on a slight sideways angle so moisture wouldn’t collect internally and discolour the material. The wires also doubled for hanging space for the salon towels.
We made three sets of panels, each set running along three wires. When positioning the three wires for each set, raise the right wire 1cm above the centre line and drop the left wire 1cm below the centre line. The control set of panels are inverted and run above the outside sets (see photo).The lengths of wires must be perfectly level from end to end to prevent the panels running downhill. The ends of the wires fold around thimbles and are secured by crimping a swage onto them (a small hollow tube that holds the wires together).
Step 1 Mark out the location of the wires (we positioned them at the height of the roof rafters). Drill holes and mount the Excalibur bolts in positions marked. Blitz Tipz: An Excalibur bolt is easy to use – drill a hole then screw it straight in, no plug needed!
Step 2 Cut Polygal panels to size (10x1m2).
Step 3 Fix the edges of each panel with sealing tape along the high side and breather tape along the low side. Complete with U profile end caps before attaching shackles to the topside (the UV treated side) of six panels and the bottom side of four panels.Blitz Tipz: Pre-drill all holes oversized to allow for expansion and contraction.
Step 4 Using a 300mm length of wire, attach a rigging screw to one end before attaching the other end to an Excalibur bolt on the wall.
Step 5 To the Excalibur bolt at the other end, attach a full length of wire then thread it through the shackles on the panels before attaching it to the other end of the rigging screw – pull it as close to level as possible by hand.
Step 6 Once fully assembled, tension the wires by winding in the rigging screws until the wires are level. Blitz Tipz: Do not over-tension or damage will result.
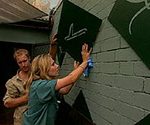
Finishing touches: Bronze Polygal panels were mounted in frames to create decorative reflective panels. The back of each panel was spray painted with black paint to give the Polygal its reflective look. Large Villaboard panels were stencilled and painted with astrological symbols. Recycled glass was used as crystals.
The decorations were put up on the painted walls using a caulking gun (liquid nails). The two raised garden beds were planted (see plan above and planting list below), watered in and mulched. Three tall black ceramic pots were planted with advanced yuccas and three bistro settings were brought in for seating.
Plants
Chamomile (Chamaemelum nobile)
low growing and evergreen
white daisy flowers in summer
needs good drainage and lots of sunlight
Cost and size: $4.50 (100mm)
Ginger lily (Hedychium gardnerianum)
2m+ in flower in summer, good perfume
rich, moist soil
cut spent flower stems to the ground in autumn
Cost and size: $18 (200mm pot), $10 (150mm pot) but you’d need to shop around
Yucca (Yucca elephantipes)
great accent plant
dense green leaves
spiky growth
Cost and size: $60-$75 (1-1.5m plants)
Cost and availability
We used mature plants in our makeover to create an instant effect for television. Our total cost of plants and materials was $6277. Savings are possible using smaller plants ($5900). Plants are readily available at nurseries. Most other materials are available from large hardware stores, boat stores, landscape suppliers or garden centres. The Gerni and most of the other tools required are available for hire.
Shade screen and reflective panels: Polygal is manufactured by CHBP and distributed by The Architectural Glazing Shop, 33 Devlin Street, Ryde 2112. Phone (02) 9809 5800.