Do It Yourself Irrigation
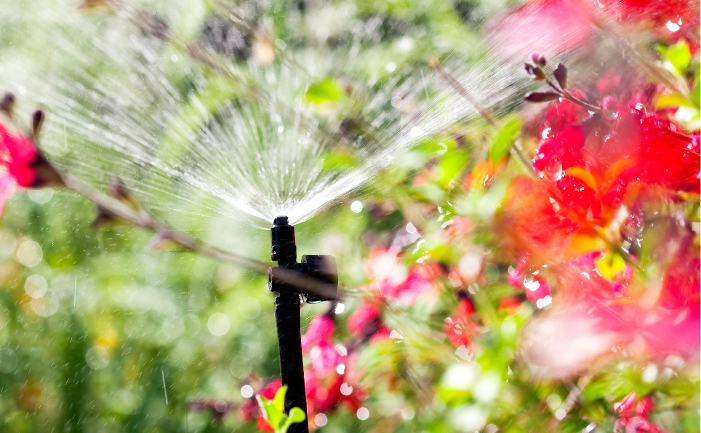
Installing a spray irrigation system in your garden makes watering a breeze, which is exactly how Sydney radio personality Ray Hadley from 2UE found the installation when he called Don in to lend a hand.
There were several areas which Ray wanted to cover such as the narrow bed along the side of the house and the front garden which is divided by a zig-zag concrete path. Don demonstrated how to install an irrigation system with the minimum amount of damage and fuss.
Step 1: Getting started
Your first step is to decide just what you want to be covered by the watering system. Draw a rough plan on paper showing the garden details (position of the house, beds, paths, tap etc) and measurements. You’ll need this to estimate the equipment for the job whether you do it yourself or go to a specialty irrigation shop for advice and service. You should plan on spacing your sprays about 1 metre apart for good coverage. If possible draw the plan to scale, using a scale of 1cm to 1 metre (see Ray’s watering system Diagram 1 below).
Step 2: Visiting the irrigation shop
To help you buy the correct fittings the irrigation shop will need your rough plan and the results of a flow test to see how much volume of water is available.
A flow test is simply an estimate of the rate at which water flows out of your tap. To find this information take all fittings (hoses etc) off one of the garden taps and turn it on full force. Place a household bucket underneath the tap and time how long it takes to reach the top of the bucket. This information will help the irrigation specialists determine the correct components for your garden.
When you visit a specialist irrigation shop they will be able to translate your rough plan into a detailed plan and estimate the length of pipe and the number of fittings that you will need.
Step 3: Laying out the system
You will be supplied with a length of black polypipe tubing. This is the main irrigation pipe from which run the sprayers. We selected 19mm width poly pipe, which delivers a good flow of water.
To make placement easier, unroll the pipe (for example on the lawn) and allow it to straighten in the warmth of the sun. This will get rid of all the kinks and curls.
Lay your piping out over the areas which you want to be watered.
Tip: When laying the tubing try to curve it instead of always cutting and joining with T-joints or elbows as you lose about 11% of your water flow with each additional joint.
Cut your pipe to fit the area using sharp secateurs (alternatively use a sharp Stanley or craft knife but take care not to cut yourself) and join with the appropriate joiner and ratchets. Leave one or two ends open to check water flow (see step 4 below).
If your irrigation pipe has to cross a path or driveway, don’t dig up the path. Instead, avoiding damage to paths and driveways by making a tunnel under them to feed the hose through. Don used a length of old galvanised water pipe to push a hole under Ray’s front path. To do this he dug a long trench on one side of the path and a shorter trench on the other. Standing on the side of the longer trench he hammered the galvanised pipe underneath the path to the side with the short trench. Wiggle and lift the pipe at intervals while hammering it through to create a suitable sized space for the plastic tubing to be passed through.
Tip: Cover the ends of the plastic tubing with tape or something similar to stop dirt getting into the pipes as they move through the soil.
If the tubing needs to go from one level to another it can be snaked through a retaining wall using a similar method to tunnelling under a path. You may also be able to feed the pipe around or behind larger rocks to disguise the tubing. Try not to dislodge the retaining wall to keep its strength.
Step 4: Check the flow
Once the 19mm pipe is laid out across the garden, connect the main tube to your garden tap. It is a good idea to insert an inline filter between the tap and the main tubing to catch anything which may otherwise block the tiny spray heads.
Turn on the tap to check the flow from the unjoined pipes. This will also flush any soil from the pipes which could impede the flow later.
When you have established that water is flowing to all parts of the system, turn off the tap and join the open ends to the appropriate joiner. Placing a ratchet clip over the piping covering the joiner and sealing with a pair of multigrips stops the tubing from coming off later – it’s often difficult to trace a dislodged seal once the pipe is buried, so save yourself some time and trouble by doing it correctly first time round.
Step 5: Selecting the sprayers
There are a number of different spray heads that can be used to cover different shaped garden beds and so avoid wasting water on paths and the like including:
90deg. heads – good for corners.
- 180deg. spray heads – use to keep spray off the path when aimed towards the bed.
- 360deg. heads – deliver a circular spray pattern that is ideal for the middle of garden beds.
- strip spray heads – to deliver a lengthways band of water for rectangular areas.
To see the spray heads and patterns we used, consult Diagram 1. For your system choose spray heads that will deliver enough water to your garden without watering the paths and driveway areas.
Step 6: Installing the risers and spray heads
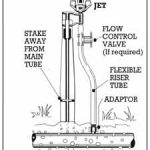
The sprayers are linked into the main irrigation pipe with narrow tubes or risers (3.9mm), usually called spaghetti tube, which in turn are attached to rigid, plastic stakes known as landscape stakes (see Diagram 2 below).
Diagram 2
Diagram courtesy of Philmac Pty Ltd., Plastic Fittings, Valves and Irrigation
Cut the risers to length (we bought a 50m role of spaghetti tubing) and attach each piece to a landscape stake and insert a joiner in the end which will be attached to the poly pipe.
Using a hosing clip punch (sold as a punch tool and available from irrigation suppliers), make a hole in the 19mm irrigation pipe at a spot which will be midway between the adjacent plants. Insert one end of the riser tubing to the main pipe and plant the stake in the ground.
Note: The advantage of using risers is that the spray head can be moved around as the plants grow without having to punch more holes in the buried pipe. Fixed risers may have plants grow over the top which will interfere with the spray, so the moveable risers on stakes are more convenient and practical.
Repeat until all risers are in position. If you make a mistake when punching a hole it can be repaired with a seal called a goof plug.
The next step is to attach the appropriate spray head to each riser. You may find it easier to first insert a brass head to cut a thread before inserting the permanent plastic heads.
Tip: Leather gloves will save your hands and give you a better grip when screwing in the spray heads.
Step 7: Finishing touches
Hold down pipe where necessary with wire pegs.
To cover the pipe dig a shallow trench 6-8cm (3-4″) deep, lay pipe in trench and cover.
Hint: Draw a map of the laid pipes or remember their location well so that you don’t accidentally cut the pipes when next digging in your garden.
Getting started
You can buy irrigation kits which contain tubing, risers and spray heads from hardware stores. Kits are available with for spray, drip or even watering baskets. Visiting a specialty irrigation shop for advice is a good idea as they can help design a system to suit your individual garden. The components for setting up Ray’s watering system came to around $250.00.
Prices:
- plastic spray heads – from 40 cents
- 19mm poly pipe – 65 cents/metre
- 3.9mm spaghetti tube – 65 cents/metre
- landscape stake (for risers) – 65 cents each
- inline filters for 19mm tubing – from $5 each
- joiners – from 30 cents each
- wire pegs – 20 cents each
- end plugs – 39 cents each
- punch tool – $39.00 but makes the job so much easier
You can add to your watering system as your garden expands. Some people find that the addition of a timer is a bonus as they can go away knowing their precious garden will get the water it needs. Manual timers are easy to install and allow for up to 2 hours watering before turning themselves off. Prices for these are from around $20 up to $60.
Timers which run on mains power are another option. To automate a 4 station controller with 4 valves, backflow, manifold plus joiners and cables you are looking at around $400.00. Speak to your garden irrigation specialist for more information and advice.
Note: When doing any jobs that require you to dig holes or trenches, always check that you are not digging in areas where any service lines (such as phone, power or water) may be laid.
Further information
Irrigation specialists are found in the Yellow Pages under ‘Irrigation &/or Reticulation Systems’. We shopped at Dural Irrigation, 270 New Line Road, Dural, NSW, 2158. Phone: (02) 9651 4111. Fax: (02) 9651 2638.