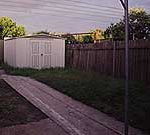


Chris Johansen spends nights and weekends in his garden shed but he’s not barred from the house nor is he tinkering on a backyard project. The shed is his study and Chris is studying hard for his conveyancing exams. Meanwhile partner Libby Mansour and baby Isabella spend their time in the house. In between the two was a totally neglected backyard. They had planned to fix the garden after their wedding later this year – but the Blitz team had other ideas. With Libby, Isabella and an unsuspecting Chris sent for a two day ‘holiday’ the team got to work.
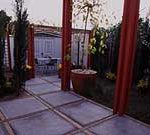
Landscape designer Colin Brown decided to completely transform the backyard. His plan called for a new paved area, covered by a stylish pergola with a Greek-inspired garden of colourful geraniums, olives and pencil pines.
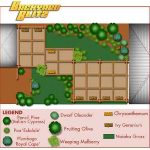
Click to
view plan
What we did
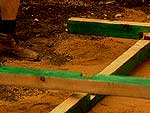
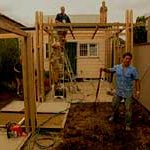
We excavated the area and built timber frames for the pavers. The frames were set in three blocks zigzagging their way across the garden. Overhead we built a perspex-covered pergola. The structure was painted. We planted out garden beds and pots and laid new turf.
Materials
Paving and pergola: treated pine timber (90x70mm for frame and 65x65mm for posts), concrete pavers (900x900mm), paving sand, paint (Murowash Pomegranate/Bordeaux 50:50 mix), wood preserver (copper naphthenate), galvanised nails (150mm), perspex (3mm sheets). Tools: plate compactor, topsoil leveller, paint brushes, string line, paver lifting straps, circular saw.
Garden beds, containers and turf: terracotta trough and pots, plants (see list below), Pot ‘n’ Peat potting mix, decomposed granite mulch (we used Deco Granite – brown). Tools: topsoil leveller, hedge shears, lawn roller.
Adapting this plan to your garden
Make a detailed scale drawing of your backyard (eg 1:100) showing the location of the house and major features then incorporate the desired elements from our makeover. As your garden will be a different size you will need to estimate the amounts of materials you will require.
Note: On your plan show the locations of any services (water pipes, sewerage, power, phone, etc) so you can avoid damaging them during the makeover.
Step-by-step
Getting started
Any rubbish, old structures, paving, weeds, etc should be removed and the site levelled.
Blitz Tipz: To make quick work of the clean-up and levelling, hire a bobcat for about $55/hour (3-4 hour minimum hire, plus transport or ‘float’ costs around $70-$100).
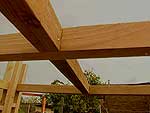
Paving and pergola
We built the framework for the pavers and the pergola overhead as one structure. The paver frame and the pergola are mirror images of each other.
Step 1 Clear the area to be paved and excavate (excavation depth is the thickness of the timber frame + 100mm for the paving sand sub-base). The paved area should slope away from the house to prevent flooding in heavy rain.
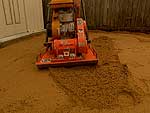
Step 2 Lay the sub-base (approximately 130mm deep) and lightly sprinkle with water. Compact to 100mm with a vibrating plate.
Step 3 Each frame holds a 900x900mm paver. For a flush finish, use a chisel or circular saw to half house out notches for the cross pieces in the framing timber (treated pine 90x70mm).
Step 4 Paint wood preserver (copper naphthenate) onto the three sides of the framing timber which will be in contact with the soil.
Blitz Tipz: Copper naphthenate is poisonous so avoid skin contact by wearing protective gloves and clothing.
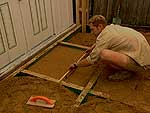
Step 5 Assemble the frame on the compacted sub-base. Nail together and make any necessary adjustments to ensure it is in the right position.
Step 6 Next position the support posts around the corners of the frame. We used four at each corner (see diagram below). Dig out the post holes to a depth of 300mm and place the posts in the holes. Use a spirit level to ensure the posts are exactly vertical. Half fill the hole with water then tip a bag of Rapidset cement into the hole, watering as you go. The cement should be filled to the top of the hole. Hold the post in position while the cement starts to set (about 4 minutes).
Step 7 Fashion a screed out of timber with a depth equal to the thickness of your pavers minus 1mm to allow for compaction (we made a 49mm screed) – see photo below.
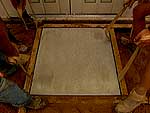
Step 8 To begin paving partially fill the frame with paving sand, trample to compact and screed to level. The large pavers we used are very heavy (100kg each). Use 2 wide hessian straps to lower the paver into position then remove the straps. The pavers in the outer corners will need to be cut to accommodate the posts.
Blitz Tipz: An angle grinder or brick saw can be used to cut the pavers.
Step 9 Sweep grouting sand into the gaps around the pavers.
Blitz Tipz: Grouting sand will fill the gaps better if completely dry so sprinkle it over the paving and allow to bake in the sun before sweeping.
Step 10 The pergola is a mirror image of the timber framing the paving. Start by building the outside frame of the pergola, butting the joists into each other thereby keeping it all at the same level. Continue butting in the joists lengthways and cut shorter lengths (noggins) to fill in crossways (see diagram).
Step 11 Cut the posts off flush with the top of the pergola and paint.
Step 12 If desired, roof the pergola with clear perspex for all weather shelter.
Diagram
Garden beds, containers and turf
If the level of the soil in your garden is too low, incorporate an organic garden mix into the existing soil in a 50:50 ratio.
Beds Plant the garden keeping plants at the same depth as they were in their containers. Water each plant well after planting and spread a 20mm layer of decomposed granite as a mulch over the entire garden.
Blitz Tipz: Do not compact the granite when using it as a mulch. Spread it thinly (about 20mm) as it is inorganic and won’t rot down.
Containers Move the containers into position before filling them. Half fill each with potting mix, place a plant in the container checking its height. The level of the plant in the mix in the new container should be the same as it was in the original pot. Finish filling the container, lightly compact, water then top with mulch.
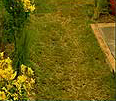
Turf Use a rake or topsoil leveller to level the area. Check the final height relative to the paving. It may be necessary to excavate if too high, or add organic garden mix if too low. Lay out the turf, cutting to shape with hedge shears, roll and water.
Our plants
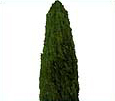
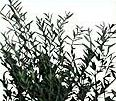
Trees: pencil pines or Italian cypress (Cupressus sempervirens ‘Stricta’), olive (Olea europaea), standard weeping mulberry (Morus alba ‘Pendula’)
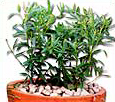
Shrubs and perennials: chrysanthemum (orange), dwarf oleander (Nerium oleander), ivy geraniums (pink, red, variegated red, and white), plumbago (Pumbago auriculata ‘Royal Cape’), variegated euonymus
Turf and grass: ‘Nioaka’ native turf (Sporobolous virginicus), Poa ‘Eskdale’
Plumbago ‘Royal Cape’
Standard weeping mulberry
Nioaka native turf
Olive
Chrysanthemum
Dwarf oleander
Italian cypress
Ivy geranium
Cost and availability
We used mature plants to create an instant effect for television. Our total cost of plants and materials was $12,345.00. Considerable savings are possible using smaller plants ($9148.00).
Plants and turf: Trees and shrubs used are readily available at nurseries. The ornamental grass and turf variety used is from Abulk, Clarendon, NSW and may not be available in all areas. Phone (02) 4577 5912 for your nearest stockist.
Pots Euro Troughs from Northcote Potteries (phone (03) 9480 4799 or (02) 9725 5233 for nearest distributor, or email: [email protected]); rimless egg pots from Decorator Terracotta (phone (02) 9450 1944).
Pavers The large concrete pavers from AA West (phone (02) 4577 4747). Other materials and hire: most other materials are available from large hardware stores or landscape suppliers. The vibrating plate compactor and most of the other tools required are available for hire.