
We took that classic backyard disaster area, the disused driveway on the side of the house, and transformed it into a tropical jungle fantasy garden complete with ponds, a waterfall, colourful plants, a boardwalk and a suspension bridge.
The progression of this fantasy garden makeover was shown on ‘Burke’s Backyard’ over three weeks detailing all aspects of the construction and planting.
Preparation
Draw up a plan to scale to show all aspects of the proposed garden in relation to the house, other existing buildings and boundaries. Our design includes a raised boardwalk, suspension bridge, pond and a planting guide.
Consult your local council to find out about planning approvals that may be required in your area.
Remove any existing paving, brickwork or rubbish that is not part of the new landscape. River sand which has been for paving can be incorporated into the garden soil.
Mark out reference points for the construction using spot marking paint or survey marking paint. (Product cost and availability : $11 for 340g spray can from most hardware stores.)
Mark out positions of the decking and poles for the boardwalk and suspension bridge with the paint and string lines. Run string lines from fixed points such as the house or fence.
Before digging locate all services such as phone, water, electricity, gas and irrigation lines running underneath the garden.
Stage 1 – putting in the poles
-
Begin by digging holes for the upright treated pine poles.
- Place the poles into the holes and brace them to ensure they are level. Use a spirit level to check that poles are straight and level.
- Mix and place rapid set concrete around the poles. Rapid concrete sets in 20 to 30 minutes. (Product cost and availability : Rapid set concrete costs $8.35 for a 40kg bag from most hardware stores.)
Stage 2 – putting in the pond
-
Begin by working out the shape and size of the pond desired. For it to look good, make the pond area as large as possible. If possible create a channel around the edge of the pond to carry away excess rain water to prevent it from entering the pond which may cause it to overflow.
- Excavate the area for the pond. We worked with spades excavating to a depth of about 300mm which is the deepest an ornamental pond can be without requiring childproof fencing. Check with your local council regarding regulations for ornamental ponds in your area.
- Next get the levels right in the pond. This can be done by an old fashioned method: a clear plastic tube of water.
- Run the water-filled tube across the bottom of the pond and up to a fixed point such as an upright pole.
- Mark on the poles on each side of the pond the point at which the water is level in the tube. The two points will then be level with each other. Additional pond levels are done using a spirit level.
- After excavation spread bricklayers sand over the excavated area approximately 50mm thick. Use a concretor’s timber float to screed the sand to give a smooth surface. This will remove any lumps or bumps which could puncture the liner.
A butyl rubber liner is the best choice for a pond lining as it will not leak and is instant. - Stretch the liner out over the pond area allowing plenty of overlap (this will be hidden later with river stones).
- Cut out around the poles, making sure not to cut below the water level of the pond. (Product cost and availability : butyl rubber pond liners cost around $20 per square metre are available from pond supply stores.)
Place large river stones (we used 30-50mm diameter Nepean river stones) over the edge of the rubber until it is covered.
Hint : when placing stones put the ‘pretty’ side up for best effect.
- Fill in the gaps around the large stones with smaller river pebbles. These can be spread from a bucket to cover the gaps until none of the black rubber is visible.
Hint : Wash the river stones and pebbles before placing them in the pond. as many are still covered with fine dirt ,which will wash off into the pool.
- (Product cost and availability : river stones and pebbles cost around $46 per tonne for any size and are available from landscape suppliers.)
- Trim any excess rubber but leave plenty of overlap to ensure that water from the garden does not seep into the pond.
A filter and pump is installed in the pond to keep the water clean for the fish. We used a biological filter waterfall which uses gravel to clean the water. (Product cost and availability : around $325 for the filter and $480 for the pump. Both are available from irrigation suppliers. Scoria or gravel for the filter costs $7 for a 20L bag and is available from landscape suppliers.) - Do not fill the pond with water until the rest of the construction is completed to provide easy access to the site as well as protecting the fish in the pond.
Warning: Do not use power tools near water because of the risk of electrocution.
Stage 3 – decking and suspension bridge
The decking and bridge construction can be done by the average handyperson. However there are advantages to hiring a professional carpenter to do the job on day labour. Carpenters will bring their own tools, saving you money, and will also give some good tips along the way.
With the poles for the decking and bridge in place, the next step is to put the bearers or joists between the poles as support for the decking. Treated pine was used for all decking and the suspension bridge. (Product cost and availability: treated pine timber in a range of sizes is available from timber yards throughout Australia.)
Hint: If you have a plan drawn to scale get your local timber yard to cut up the treated pine into the lengths needed.
The level for the bearers is measured in the same manner as the level for the pond using a clear plastic tube filled with water. The bearers are fixed with galvanised bolts to the upright poles.
The decking planks are fitted around the upright poles using a contour gauge. Gently push the gauge up against the log. Trace this onto a waste piece of timber and cut a template to check that it fits around the pole. If it works on the template then trace it onto the good piece of treated pine. (Product cost and availability : contour gauges cost about $13 from most hardware stores.)
Use string lines to mark the joist line to show where to nail the decking to the joists. When nailing the decking use decking nails as these have a screw thread at the base and a rounded head so they will not come out. (Product cost and availability : decking nails are available from hardware stores.)
Hint 1: Rough up your hammer on some concrete before hammering in the nails so that the hammer does not slip off the rounded head of the nail.
Hint 2: When hammering hold the hammer at the base of the handle for better leverage and nail all the decking boards into position.
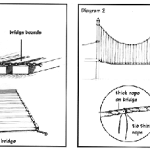
Next step is to construct the suspension bridge which is supported by a galvanised metal chain. Cut one board length, drill holes through it and use it as a template for the rest of the bridge. Then drill holes through the template for each board.
Assemble the bridge upside down lying all the boards in a row (see diagram 1). Using chain for the base makes it easy to measure the exact distance between the boards because you can count out a set number of links per board. Then simply push a galvanised bolt through the drilled hole and secure with a washer.
The most difficult bit is to attach the bridge to the decking. In our makeover one end of the bridge was attached to sturdy eye bolts in the decking and the bridge was rolled out over a plank towards the other end of the decking. To stretch the bridge out, use a rope pulled through the last board and fastened with a couple of hitches. This rope is then tied to another log to pull the bridge to the hooks. The bridge is then attached to the hooks with sturdy eye bolts and all bolts on the bridge are tightened.
Hint: A reputable timber merchant who specialises in the supply of timber and play equipment can be consulted for correct sizing of fixtures to accept loads.
Rope is later attached to the bridge to accentuate the Indiana Jones look but it will be added after all the plants are in the garden. The rope appears to take the weight of the bridge but it is the chain that takes the load. Tie a finer rope from the thick rope to the base of each board on the bridge to complete the illusion of the suspension (see diagram 2).
Trim the upright poles at either end of the bridge to an adult eye height. Don Burke found some black cast iron lanterns with candles inside that sat on top of the posts. The lanterns can be painted gold.
Stain any knot holes and imperfections in the poles or decking with a black stain. The decking is finally coated with decking oil to create an aged timber look. (Product cost and availability: Wattyl’s Natural Decking oil 4L is $44.95 and Wattyl’s Decking Stain ‘Charcoal’ 1L is $22.45, available from hardwares throughout Australia.)
4. Final touches
- The job is finished by planting plants (see plants and planting list below), filling the ponds and introducing the fish (see details below) and installing the ropes on the suspension bridge (see details for this above).
- Once the rest of the work is completed fill the pond with water.
Put neutraliser in the water to rid the water of chlorine. (Alternatively let the water stand for a week and the chlorine will dissipate on its own and be fit for fish.) - Run the water through the filter and pump a few times before finally putting the goldfish in the pond. To release fish first float the bag containing the fish in the pond for around 20 minutes. This will allow the fish to acclimatise to the water temperature so they can be safely released into the pond.
(Product cost and availability: Neutraliser is available from aquatic stores for about $12 for 500mL bottle. Gold fish are available from some pet shops or aquarium specialists.)
Plants
A range of Australian native and exotic rainforest and other plants have been used as well as specific water plants in and around the pond. Some existing plants were kept and incorporated into the garden. There are three layers of plants.
- Layer 1: Overstorey plants such as palms that give bulk to the garden and create the tropical feel. These plants also provide some shade.
- Layer 2: Understorey plants including ground cover plants, climbers and colourful foliage plants to bring out the colour and excitement of the rainforest.
Water plants in and around the pond. Some old hollow logs found on the property were also added around the edge of the pond to give that Indiana Jones look.
Plant list
1. Overstorey plants included:
a bangalow palm (Archontophoenix cunninghamiana ) is the centrepiece of the garden. It has been positioned to hang over the boardwalk to shade the area.
a grove of kentia palms (Howea forsteriana ) around the bangalow palm ties in with an existing planting of kentias beside the house.
tree ferns (Dicksonia antarctica ) and bird-of-paradise (Strelitzia reginae ) also add height and texture.
2. Understorey plants included:
nandina (Nandina domestica ) and yucca (Yucca elephantipes ) were selected for a dry, sunny spot against the house.
shade tolerant climbers are used as ground covers including kangaroo vine (Cissus antarctica ) and Mandevilla ‘Alice du Pont’. Kangaroo vine is a vigorous ground cover which can need regular pruning.
baby’s tears or helxine (Soleirolia soleirolii ) is used to form a mossy ground cover.
New Zealand variegated flax plant (Phormium tenax ) was selected for its cold tolerance and coloured foliage (look for named cultivars in the Maori Magic series). Other strappy leaved foliage plants included flax lily (Dianella caerulea ), Cordyline stricta and a water flax (Acorus gramineus ).
Hint: When planting don’t dig a huge hole, instead plants grow better if they are raised a little to provide good drainage. If they are buried too deep they will probably die.
a wide range of bromeliads were selected to give colour to the understorey. These plants were placed in a special coarse bromeliad planting mix of pine bark. The foliage colour of the bromeliads are a feature of the understorey planting. As well a form of bromeliad, Spanish moss, was used to festoon the ropes on the suspension bridge.
Other colourful and leafy foliage plants included staghorn and elkhorn ferns, dwarf lillypilly (Syzygium australe ‘Bush Christmas’), gymea lily (Doryanthes excelsa ), arum lily (Zantedeschia aethiopica ), Australian ginger (Alpinia caerulea ) and elephant’s ear or giant taro (Alocasia macrorrhiza ).
3. Water plants were positioned in and around the pool including:
Stream lilies (Helmholtzia glaberrima ), water cress (Rorippa nasturtium-aquaticum now Nasturtium officinale ), nardoo (Marsilea drummondii ), umbrella grass (Cyperus alternifolius ) and milfoil (Myriophyllum propinqum ).
Further information
Below are listed the details of the specific suppliers for products and plants used in the makeover. Similiar businesses would exist in other states.
Design and construction:
The landscape was designed by Don Burke inconjunction with Brad Baxter of Award Pools and Landscapes, Lot 4 Old Windsor Road, Kellyville, NSW, 2155. Phone: (02) 9629 3639.
Don was assisted by professional carpenters Matt and Rowan Pettigrew, Mattason Landscape and Outdoor Carpentry. Phone: (02) 4575 2058.
Plants were supplied by the following nurseries:
Bromeliads – Bromeliad Man, Bob Christofle. Phone: 018 471 754 or (02) 9477 5637.
Palms, rainforest and foliage plants – wholesale nurseries as well as:
* Annangrove Grevilleas Native Nursery, 98 Annangrove Road, Kenthurst, NSW, 2156. Phone: (02) 9654 1380; and
* Silver Spade Nursery, 422 Old Northern Road, Glenhaven, NSW, 2156. Phone: (02) 9634 2379.
Note: Most would be available from your local nursery.
Water plants and goldfish – Ledora Aquatic Plants, Pacific Highway, Mount Kuring-gai, NSW, 2080. Phone: (02) 9456 1163.
Materials were supplied by the following companies:
River pebbles, stones and organic material – Australian Native Landscapes supplied river pebbles and other organic materials. Phone: (02) 9450 1444.
Pond materials including the filter and pump for the pond – Waterworld, 598a Old Northern Road, Dural, NSW, 2158. Phone: (02) 9651 4949.
Timber – Midcoast Timber Centres, 58 Waratah Street, Kirrawee, NSW, 2232. Phone: (02) 9521 8611.