Like most herbs, parsley likes to be grown in a mostly sunny spot, but parsley is versatile in that it can take some shade through the day. In fact, in very hot parts of Australia, some shade during the middle of the day, or the afternoon, would be preferable.
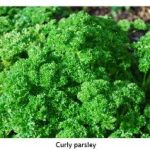
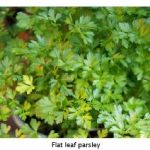
Varieties: there are two basic varieties of parsley – flat leaf and curly leaf. The flat leaf parsley (often called Continental or Italian parsley) has a stronger flavour than the curly leaf parsley. Both are excellent in cooking, and both are well worth growing in your garden.
Time to plant: spring is an excellent time to plant parsley seed or seedlings, but you can start parsley anytime in spring, summer and autumn. Parsley can be grown from seed or seedlings, but it’s generally easier to sow seed, as parsley doesn’t like being transplanted, and can be a bit temperamental in the first few weeks after planting, especially during periods of warm weather.
Seed tips: the only problem with sowing parsley seed is that they are slow to germinate, usually about three to four weeks. Some gardeners speed up germination by soaking seed in water overnight, prior to sowing, other say they water in seed with hot water when sowing it. Neither tip is essential, and if you just scatter the seed, lightly rake it in and water it, it will eventually sprout.
Seedling tips: if planting seedlings, water in with a Seasol solution (mixed up in a watering can, according to the directions on the label) and water again with Seasol fortnightly, until plants are growing strongly. Remember to keep on watering seedlings until well established, especially if the weather is warm.
Fertilising: once plants are growing well, fertilise monthly with a liquid plant food such as Nitrosol.
Harvesting: start picking leaves as soon as plants are established. In fact, the more you pick parsley the denser and better its growth will be.
Re-planting: parsley doesn’t last forever, but it will last from one to two years, depending on where it’s grown, so when it starts to send up seed heads, it’s time to replace the plants. However, if you let some of your parsley plants go fully to seed, there’s every chance these seeds will sprout and your parsley patch could become self-perpetuating, and you won’t have to buy any more seeds or seedlings.
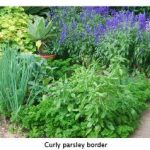
Parsley borders
You can create a very pretty look in kitchen gardens by sowing a parsley border. Curly leaf parsley looks best in this role. To create a parsley border, just sprinkle parsley seeds along the line where you want the border to grow. Lightly rake the soil then water in the seed. Remember, the seed will take three or four weeks to sprout, but if you sow seed now in Sydney and areas to the north, it should pop up just as the September warmth starts to arrive, so by October your parsley border should be taking shape, and by December it should be magnificent!
Cooking with parsley
There’s a lot of nonsense said about how inferior curly parsley is to flat-leaf parsley. Curly leaf parsley does have a milder flavour compared to flat leaf parsley, but it’s still a very good, versatile herb that goes well in sauces, soups, stews, salads and many other dishes. Curly leaf parsley is easier to chop finely than flat-leaf parsley. In fact, after washing flat leaf parsley, it’s a good idea to hang it upside down for half an hour to let it dry thoroughly, before chopping (I attach washed parsley bunches to a cupboard door handle in my kitchen). It’s best to chop parsley just before you need to add it to the dish, not hours beforehand.
Keeping parsley
Dried parsley isn’t worth bothering about. Use the fresh stuff. If you’ve bought a bunch of parsley and have only used half the bunch, put the rest of the bunch in a glass of water (stalks in the water) with a plastic bag over the leaves and put that in the fridge. It should keep well that way for a few more days, but remember to change the water each day. If you keep the leaves in a plastic bag in the crisper section of your fridge, they will keep for a day or two, but they’ll start to go black if you don’t use them soon.
Tracy Rutherford’s Veal cutlets with Olive and Parsley Pesto
Tracy’s recipe originally appeared in the September 2005 issue of Burke’s Backyard magazine.
• 8 small veal cutlets
• 1/2 cup plain flour
• 2 eggs, lightly beaten
• 2/3 cup packaged breadcrumbs
• 1/4 cup blanched almonds
• 1 cup flat leaf parsley
• 1 cup (160g) green olives, pitted
• 1 tablespoon capers
• 1 garlic clove, chopped
• finely grated rind and juice of 1 lemon
• 1/3 cup extra virgin olive oil
• vegetable oil, to fry
1. Dust the cutlets with flour, then dip into egg and then the breadcrumbs. Don’t worry about coating the bone, just the meat. Refrigerate for 30 minutes.
2. Meanwhile, combine the almonds, parsley, olives, capers, garlic, lemon rind and juice into a food processor. Process until well chopped, stopping to scrape down the sides occasionally. With the motor running, slowly add the olive oil, until everything is well combined as a paste. Transfer to an airtight container.
3. Heat a 5mm depth of vegetable oil in a large, heavy-based frying pan. Cook the cutlets (in batches) over medium high heat for about 6 minutes each side, until they are golden brown. Drain on paper towels.
Note: you could use lamb cutlets if veal cutlets aren’t available.
Salmon Fillets with a Parsley Crust
120g stale day-old bread, torn into pieces
1 clove garlic, crushed
1/2 cup chopped fresh parsley (curly or flat-leaf)
1 teaspoon grated lemon rind
salt and pepper to taste
1 dessertspoon olive oil
Put all the ingredients in a food processor and whizz until combined.
Place four salmon fillets on a lightly oiled baking tray. Top each fillet with the parsley/breadcrumb mix. Bake in a moderately hot oven (190°C) for 20 minutes for rare, or 25 minutes for well done.