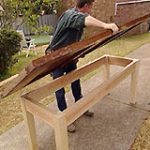


Scott Cam demonstrated how to turn a secondhand door into a dining table. Scott’s table is cheap, easy to make and it looks great!
Measurements
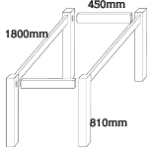
Door: 2100 x 850 x 40mm Framework: 1800 x 450 x 810mm Table: 850mm high
Timber Sizes
4 x legs 100 x 100mm – you’ll need 3.4m timber 4 x rails 50 x 150mm – you’ll need 4.5m timber
(Tip: buy dressed timber and make sure it’s not warped or twisted – straight timber ensures a perfect job)
Tools square & pencil saw & chisel drill & screwdriver wood glue sandpaper & varnish
Step by step instructions
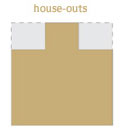
- Measure your door and build the supporting frame to allow for an overhang all the way round. Scott cut two rails at 1800mm and two at 450mm, to suit his tabletop. Measure back 25mm from each end. This is your house-out mark for the mortice and tenon joint. House-out both faces at the rail end to a depth of 15mm, leaving 10mm in the middle for the tenon (see diagram).
- Determine the height you want to make your table. Scott’s was to be 850mm, the tabletop was 40mm thick so he cut four legs at 810mm. The legs have to be morticed on two faces to match the tenons of the rails. Mark these out so that the male end matches the female joint (see diagram). Cut these out with a circular saw or hand saw, then clean up the cut with a sharp chisel. Remember the sides of the mortice joint won’t be seen, but the bottom will be.
- Match up and mark your mortice and tenon joints. Then make sure they all fit neatly before you begin to apply any glue. If they don’t fit properly, shave and trim them so that they fit the table base perfectly when dry (without glue). This allows you to finesse your joints before finally glueing them all together.
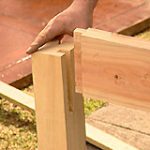
- Once the joints fit perfectly, apply glue liberally (have a damp cloth handy to wipe off any excess). Fit your table together on level ground – a great way is to place newspaper on floorboards inside your house and assemble it there. Wipe off the excess glue straight away to stop it staining your timber. Pre-drill the legs and screw the mortice and tenon joints together, at the same time putting a square on the inside of the base to make sure you get a perfect 90° angle in each internal corner of the frame. For television Scott nailed his joints (see photo).
- To fit the top you can either screw some small blocks to the inside of the rails and then pre-drill and screw up through these to the underside of the tabletop, or simply pre-drill and screw down through the table into the rails.
- If you’re using an old door, it will need to be cleaned and sanded before applying the finish. Once the table is prepared, apply some stain or finish. Give the table a light sanding between coats.
Further reading
You’ll find instructions for making this table in the September edition of the Burke’s Backyard magazine, along with Scott Cam’s regular column ‘Tricks of the Trade’.
The magazine is available at newsagents for $4.60.