Scott and Tara faced a real challenge updating this kitchen and family room, which was a classic leftover from the 1970s. The original layout didn’t make the best use of the available space, the exposed brick walls looked daggy and the kitchen had seen better days.
Budget solution
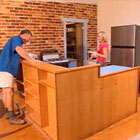
- The old kitchen was demolished and a sparkling white, space-efficient kitchen was installed. Rather than engaging a kitchen design company at a cost of $20,000 or more, Scott and Tara opted to install a ‘flat pack’ kitchen themselves. They chose the design from a preset range of cabinet sizes and styles. (Tip: companies that sell flat pack kitchens usually have showrooms with a whole range of kitchens on display, and these are great places to get ideas and compare prices.)
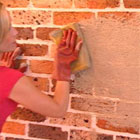
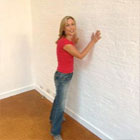
- The problem of the exposed brick wall was solved very easily and cheaply. The wall was bagged and then painted white (Dulux ‘White Watsonia’) to tie in with the new, all-white kitchen theme. (See Tara’s bagging tips below.)
- A stainless steel splashback, plus modern furniture and fixtures (on which hundreds of dollars were saved by purchasing from seconds stores) give this room a truly contemporary, New York loft theme. The new room not only looks great but is also much more user-friendly.
- Having white walls means that you can transform the look of the space in a matter of minutes, whenever the mood takes you. By changing simple features such as cushions, candles, flowers and artworks, this area now takes on distinct summer and winter looks. The key to this theory is to stick with the same colour tones for each individual look.
- As a finishing touch, Don presented Tara with a plant (Restio tetraphyllus) he’d bought at the tubestock nursery and potted up. Restio tetraphyllus has bright green, grassy stems covered with sheathing leaves. It makes an excellent foliage plant for containers or a moist soil position in the garden.
Design elements
Kitchen
We used a flat pack kitchen from IKEA. IKEA supplies the standard measurements of the cabinets, then the clients decide how many they want, where they want them and what sort of doors they’d like. In this case white Applaud doors were chosen but you can get timber, glass and other looks. (Note: If you don’t want to tackle the kitchen installation yourself, there are tradesmen who specialise in installing flat pack kitchens. Professional installation of our kitchen would have been around $600.)
Dining
The Eastside dining table and Siri chairs were purchased from a seconds store (Freedom Excess), saving money but not losing out on looks.
Lounge
Tara saved around $300 by buying the lounge as a second. (Tip: ask in retail stores if you can buy items ‘off the floor’, as this can also save you money.)
Lighting
We chose industrial-looking, aluminium lights from IKEA, and they really add to the look of the room. However, don’t forget that it’s illegal to do any electrical work yourself, so call a qualified electrician.
Accessories
Most of the accessories in the family room are clever, budget saving ideas. The urn holding the bamboo is simply a $20 terracotta pot painted with some left-over wall paint, then decorated with a few pieces of silver leaf (available from art supply stores). The cushions were made from fabric remnants ($9 from Spotlight stores) and the artwork for the walls is a colour printout mounted inside glass clip frames ($19 from IKEA stores nationally).
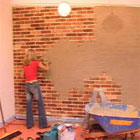
Tara’s bagging tips
- To make the bagging mixture, mix 4 parts sand with 1 part cement. This is quite a loose mix, but on really hot days you might want to add a little water to make application easier. Tara used yellow brickies sand and off-white cement. You can change the colour of the mix by using different coloured sands and different coloured cements, or you can add oxide pigment, which comes in a range of colours from yellows through to reds and even blue.
- Put down plastic drop sheets then moisten the brick wall with water. This can be done with a fine spray from the hose, or with a sponge and bucket of water. If you don’t do this, the bricks will suck the moisture out of the bagging mixture, making application difficult.
- Apply the bagging mix with a towel, hessian bag, sponge or broom – each will give a different finish. (Note: having 2 baggers can be more hindrance than help, as everyone has a different technique.)
- Before painting allow the bagged surface to dry for a week or so, then give the surface a firm brush to remove any loose material.
- As the bagged surface will still be very absorbent, allow extra paint for the first coat.