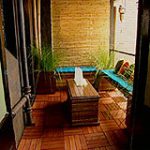
Rita Hill and Scott Cam teamed up to transform a small, ugly balcony into a fabulous entertaining area. The balcony was originally a fire escape and was a tiny, 4 square metres in size. However, lack of space wasn’t the only problem facing Rita and Scott. The area was cluttered by a table and chairs, the paint on the walls and floor was peeling, visitors had to sit under a rusty tin awning and were screened from the neighbours by a thin, tatty blind.


Design solution
To make the balcony more user-friendly and increase the seating area, Scott built benches along two walls divided by planter boxes. Rita painted the walls, doors and windows, and timber tiles were laid over the old concrete floor. Cushions, bamboo screens and a storage table completed the stylish new look.
(Note: if you are renting remember to get permission before painting or changing any permanent fixtures.)
How it was done
1. Rita prepared the walls for painting by washing them down with sugar soap, then undercoated them with Porters Limeproof Undercoat Sealer. She then applied two coats of Porter’s Liquid Iron Base and finally one coat of Porter’s Instant Rust (see pic). (Tip: spray the Instant Rust on with a spray bottle for a more irregular look.) The windows and doors were painted with black gloss to match the walls.
2. A Serene bamboo screen (1800mm x 3600mm) was attached to the awning beams to cover the rusty awning. 30mm bamboo slat cladding (1800mm x 1800mm) was used to create a privacy screen. Bamboo was also used as a decorative cover for a storage box/table. (Tip: these products can be heavy when ordered in large quantities so be sure to have some friends on hand to help with the installation.)
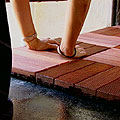
3. The floor was covered in jarrah decking modular tiles from Ezy Deck. The tiles join together using a simple plastic locking system. They should be laid on a solid, well-drained surface and are suitable for most paved or concrete areas. They come in jarrah or natural, in a variety of patterns. We chose pre-oiled tiles which are suitable for use outdoors. (Tip: If you need to cut a tile to fit into a space, it should be re-treated with oil.)
4. The bench seats and the planter boxes were stained in Wattyl Decking Stain ‘Mission Brown’ and finished with Estapol Speed Clear Gloss lacquer. Scott then installed them on the balcony (see Scott’s instructions for making the bench seats below).
5. The planter boxes had no bottoms, so pot feet were used to raise the pots off the ground and improve the drainage. The pots were planted with Lomandra longifolia ‘Tanika’. This new variety of lomandra grows about 600-700mm tall. It grows in sun or shade, tolerates heavy frost, remains green throughout the year and is suited to all soil types.
6. Rita made foam bench covers with tassels and scatter cushions to add comfort and colour to the area (see instructions in the March edition of the Burke’s Backyard Magazine).
7. As the bench seats were placed next to the edge of the balcony, the height of the railing was raised. This made it safe for both kids and partying adults to use the balcony. (Tip: always make sure balcony railings are strong and high enough to prevent mishaps.)
8. Small Hurricane lamps were hung from the awning facia to light the balcony at night.
Making the bench seats
What you’ll need:
32m 70 x 20mm decking boards (planters and bracing)
8.5m 150 x 50mm treated pine, dressed (benches)
1.8m 100 x 50mm treated pine (bench support plates)
5.4m 50 x 50mm treated pine (bracing)
Tools:
saw (preferably a power saw)
hammer, nails
screws
glue
tape measure
pencil
square
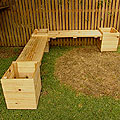
1. The bench seats are made of three planks butted together, and the planter boxes are the same width as the benches. So cut the bench seats first to determine their exact, final width. Later, the planter boxes will be made to the same width. The length of each bench seat here is 1400mm. Scott used 150 x 50mm treated pine, but after it was dressed by the timber mill, it actually measures 140 x 45mm. That means the width of the bench seat is 420mm (140mm x 3). Cut six 1400mm lengths of the treated pine – three for each bench.
2. Lay out three pieces of the 1400mm long bench timber, making sure the ends are perfectly square. Cut six lengths of decking boards to a 420mm length. Lay these across the bench timbers as bracing (one near each end, one in the middle) and fasten it all together with glue and nail, or glue and screw. You should now have two benches measuring 1400mm long and 420mm wide.
3. Each side of the planter boxes consists of five 70mm x 20mm decking boards, each spaced 10mm apart. When you allow for 30mm high feet at the bottom of each box, that makes the whole thing 420mm high. So, two sides need to be cut at 420mm (the width of the bench), the other two sides at 380mm. That way the overall dimension of the planter boxes will be 420mm wide, 420mm deep and 420mm high. Cut out all your planter sides: you’ll need 30 pieces at 420mm length, and 30 at the 380mm length. Take your time measuring and cutting.
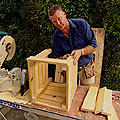
4. Now cut the 50 x 50mm timber into four pieces for each planter, each 420mm long. These will be the vertical bracing for the inside corners of the planter boxes. Fasten the 380mm long decking boards to this vertical bracing, making sure the ends are square and flush. Space the decking boards out with 10mm gaps between them, along the bracing. Leave a 30mm gap at the bottom end of the bracing to create the ‘feet’ for the boxes. Nail the six 380mm sides to the bracing.
5. To complete each planter box, stand on end two completed sides, and lay the 420mm pieces across them and fasten them to the braces. Make sure everything is square and true as you’re working.
6. Now that the planter boxes are made, a timber plate is required to support the benches where they connect with the planter boxes. Cut 4 pieces of 100 x 50mm timber at 380mm. Using screws and glue, fasten two of these plates on the connecting faces of one box (the one in the ‘centre’ of the structure). The two boxes at either end require only one plate each to be glued and screwed to the planter boxes.
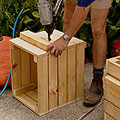
7. Nearly there! Set out your planters and lay the benches on the plates. Pre-drill and screw the benches to the plates. That way it can be dismantled in the future. Give it a bit of stain or paint work, then pop some plants in, add the beaut cushions, kick back and relax.
Materials
Paint:
Porter’s Limeproof Undercoat Sealer – $55 for 4 litres
Porter’s Liquid Iron Base – $54 per litre
Porter’s Instant Rust – $26 for 500ml
Wattyl Decking Stain Mission Brown – $30.15 per litre
Estapol Speed Clear Gloss lacquer – $17.40 for 500ml
Bamboo:
House of Bamboo
13 Erith Street
Botany, NSW
Phone: (02) 9666 5703
Website: www.bambuzit.com.au
They have a wide variety of bamboo products for indoors and out, and will make up screens to measure and deliver Australia-wide for an additional fee. Also look under ‘Cane & Bamboo Products’ in the Yellow Pages.
Decking:
Ezy Deck Austimber Supplies
8 Windsor Rd
Box Hill, NSW
Phone: (02) 9627 5001
Similar tiles are available from Porta, call the sales hotline on 1300 650 787.
Plants:
Lomandra longifolia ‘Tanika’ is available in nurseries in Sydney this month and Australia-wide in April. Expect to pay about $8 for a 140mm (6′) pot.
Further information
For full details on this balcony makeover, see the March 2002 edition of the Burke’s Backyard magazine. It is available at newsagents and supermarkets for $4.95.