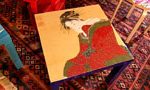
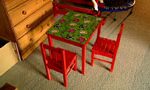

Pictures and prints add cheer and colour to your home, but they don’t always have to be framed and hung on the walls. Rita Hill showed how to use découpage to turn a plain timber tabletop into a stunning work of art.
You will need
- A small table, old or new (we used a Lack side table from Ikea stores)
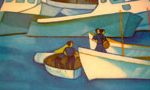
- A favourite print or good quality wrapping paper
- Bottle of Clag glue
- PVA glue, such as Aquadhere
- Craft Smart Liquid Gloss (we bought ours at a Spotlight store, and it should be available at other craft retailers)
- Brushes (cheap or disposable)
- Scissors, blade or scalpel
Step by step instructions
1. Use a pen to trace the shape of the tabletop onto the back of the art print or paper you decide to use. Then cut out around the pen line so your print is the same size as the tabletop.
2. Make sure the table is free of all dust and dirt, and then spread some Clag glue evenly over the entire tabletop using a brush. (Tip: craft and art shops may recommend other glues, but Clag gives a very good result.)
3. Attach the print to the table, smoothing it out and pushing out any air bubbles as you go. It may buckle a little, but don’t worry. If the print overlaps the tabletop, trim the excess using a blade or scalpel.
4. Mix PVA glue in a bowl with a little bit of water so it’s a smooth consistency. Paint this over the print to seal it. It goes on milky, but will dry clear. Apply two coats of the PVA and water mix, but allow several hours for the first coat to fully dry.
5. Once both coats of PVA are dry, add a brilliant, shiny coat of Liquid Gloss. Combine even quantities of Liquid Gloss solutions in a disposable plastic container and mix together well. Tip the Liquid Gloss onto the tabletop.
6. Spread the gloss thickly and evenly to the edges of the table, using a cheap, disposable brush. You can paint the edges and legs of the table too, if you like.
7. Finally, using a drinking straw, gently blow out any bubbles that you can see in the gloss. You’ll be amazed how wonderful that glossy finish will look! Put the piece aside to dry, but check the sides for any dribbles for an hour or two.
Note: after both the Clag glue step and the PVA stage Rita advises not to leave the work for days, or the paper will start to come off. Overnight is about the maximum time you could leave the work, particularly now that the weather is warming up.
Further information
Rita Hill’s article ‘Top Tables’ is featured in the September 2000 issue of the Burke’s Backyard magazine.