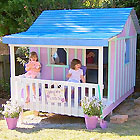
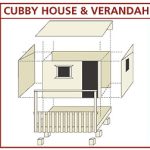
Building A Cubby House
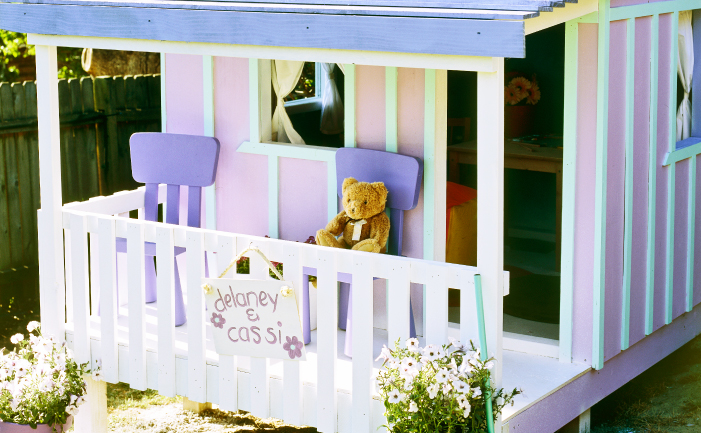
Backyard Blitz builder, Scott Cam, showed how to build a fabulous cubby house for two little girls, Cassi and Delaney. Once the cubby was completed, Tara Dennis and the girls added some finishing touches.
Building the cubby:
Materials
1 bag Rapid set concrete
20 x bugle baton screws
75mm galvanised nails (Nail gun hire can include a box of 1000 x 75mm nails)
2 x 1kg bags 50mm x 2.8 flat head clout roof nails
6 Lm 90 x 90mm H4 treated pine posts
15 Lm 150 x 50mm hardwood beams
6 sheets 2400 x 1200mm exterior bb board 12mm ply
50 Lm 70 x 45mm hardwood timber
15 x 1200mm treated pine pickets
35 x 2100mm treated pine fence palings
90Lm 42 x 10mm treated pine lattice batons
(Note: When ordering the timber, make allowances for wastage. Materials are often supplied in varying lengths and quantities. Don’t burn treated timber off cuts. We recommend drawing a plan for each step.)
Scott’s step by step instructions
Council regulations vary and approval should be sought before beginning construction.This cubby can be built using hand tools. However, if using power tools, take the necessary safety precautions.
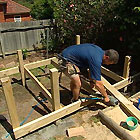
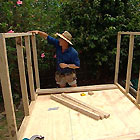
Step 1 – Floor
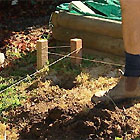
Mark out a rectangle on the ground measuring 2300 x 1800mm. These are the post’s outside dimensions and define the perimeter of the frame. Use a string line to set this out very accurately. Dig post holes in each corner and two post holes 700mm back from the front edge, these posts define where the verandah joins the cubby. Dig all post holes to a minimum depth of 600mm. If you are sinking the posts in uneven ground, ensure that there is plenty of post above the ground, the excess will be trimmed off later. Use rapid set concrete to secure the posts.
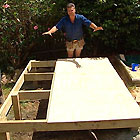
(Tip: treat all cut timber ends with a propriety treatment to stop rotting. ‘Stop Rot’ timber treatments available in 1 litre) Next attach the beams (called bearers) to the outside of the posts, forming a frame around the perimeter (see pic). Ensure that the beams are level and provide a step-up of no more than 300mm from the ground to the top of the beam. (Tip: if the ground is uneven, measure this step from the high side of the ground.) Use the bugle baton screws to attach the beams to the posts. Attach two 150 x 50mm cross members, one at 700mm (behind the verandah posts) and another at 1800mm from the front bearer. Nail these into the endgrain from outside the bearers. The join of the two floor sheets will need support. Measure 675mm across from a front corner and put down a final 150 x 50mm beam (a noggin) so that the edge of the two floor sheets will fall over half of the noggin. Now trim the posts off level with the bearers. Lay one 2400mm x 1200mm sheet of ply flush with the corners of the frame (remember the inside length should fall over half of the noggin) and a second sheet (cut to 2400mm x 700mm) to finish the floor off.
Step 2 – Walls
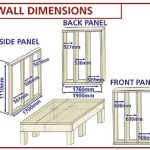
To make the four wall frames, use the 70 x 45mm timber (tip: the finished floor is a handy place to build the wall frames). Do the two side walls first. Cut out the top and bottom plates at 1700mm lengths, lay them side by side and mark out the studs at approximately 500mm spacings (this gives us four studs). This allows for windows, which you’ll add later. The height of these wall frames is 1200mm, to suit the sheet size, so accounting for the width of the plates, the internal stud size is 1110mm. Measure and cut all the studs and build each frame separately. Now stand them and nail down through the floor and through the corner studs. We did not put in any noggins, apart from a sill plate for the windows. Nail a piece of timber between the two centre studs of either wall 600mm up from the floor. The top plate will act as the top of the window. Follow the same method for the front and back walls. Cut your top and bottom plates to fit between the side walls, it should be about 1760mm. Now, accounting for a door and window in the front wall, measure out the spacing between the first and second studs to about 500mm, and about a 600mm spacing for the remaining two studs. Attach the studs and another sill plate for the front wall. The back wall will have spacings at about 530mm. Slide the front and back walls in and nail off, including the corners. Now cut and attach one sheet of 1200 x 1700mm ply to each side wall. Cut and attach a 1200 x 1900mm sheet to the back wall. Drop these side wall and back wall sheets 25mm down each frame. This covers the joins at the floor and leaves a portion of the top plate to attach a gable sheet under the roof. Cut and attach a 1200 x 1400mm sheet for the front wall. This provides a front door.
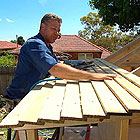
Step 3 – Roof frame
Only four roof rafters are required. A pitched roof looks great but can be complicated to build. An easier alternative is to build a skillion roof instead. On the top plate of the frame at the back wall, nail a second top plate (the 45mm length at the vertical). Using 70 x 45mm timber (with the 70mm length at the vertical), nail four skillion rafters to the back wall top-plate at about 470mm spacings. These will run from the back wall to the verandah and also sit on the top plate of the front wall. Let the rafters run about 100mm past the front of the verandah to allow for the width of the verandah posts and verandah bearer.
Step 4 – Verandah and roof
Attach two verandah posts to the two outside rafters. Measure the length down from the two outside rafters to the bottom of the floor frame and cut two lengths of 70 x 45mm timber to suit. Nail these verandah posts in place at each front corner and to the outside rafters (the 70mm length facing towards the front). Now attach a 1900mm long (70 x 45mm) verandah bearer at the top of, and to the front of the verandah posts and under the four rafters. The extra top plate on the back frame will give the fall required for the roof to disperse rain (however remember this is not a waterproof structure). Attach a cross beam to the verandah posts 600mm from the floor to support the verandah pickets. Space the pickets at no more than 80mm (tip: use a picket as a spacer). Fasten them to the floor frame at the bottom and the cross beam at the top. Using 2100mm treated pine fence palings, start at the lower end of the roof and attach the first paling. Overlap each consecutive paling 20mm, nailing to the previous paling and the rafters. Continue this until you have covered the entire roof. To neaten the roof up, you could nail a paling at each end as fascia boards. To make the side gables, measure out and cut-to-size two triangular panels (approximately 1700mm long, 140mm high at the back and 95mm high at the front). These will cover the gap left by the skillion roof on either side of the cubby. Nail to the exposed top plate and end rafters. Cut the back gable to 1900mm long and 140mm high and attach.
Step 5 – Windows
To cut the windows out, mark out a square with the bottom holes directly above each sill plate and the top holes below the top plate. Drill a hole in each corner of the square and then cut out the window.
Step 6 – Trimming
The trimming is up to you. Scott used treated pine lattice batons to finish off the edges and provide a ‘country cottage’ look. Just cut the batons to length (mostly 1200mm) and nail. Use the off cuts to provide trimming around the windows.


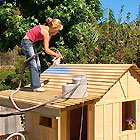

Painting the cubby
Tara painted the roof and inside walls of the cubby with a blue colour (similar blues from Dulux in acrylic exterior paint include ‘Phuket Palette’, ‘Blue Astro’ and ‘High Blue’). To look at the Dulux colour palette, go to www.dulux.com.au, click on ‘Colour Inspiration’ then ‘My Colour’, then blue in the colour palette. To make the job easier, Tara used a spray gun. (Tip: If using a spray gun for the larger surfaces, one coat will usually suffice. If using a brush or roller, we recommend at least 2 coats).
For the body of the cubby house Tara chose Dulux ‘Feminine Fancy’. She detailed the batons in Dulux ‘Sweet Aqua’ and painted the verandah and bannisters in Wattyl Solagard ‘White’.
Cost and availability
Materials for the cubby cost approximately $1,900.
Tara used a Wagner spray gun, which costs $270 and is available from hardware and paint supply stores. (High volume, low-pressure paint spray guns cost about $100 a day to hire.)
Paint:
Dulux ‘Pannikin’ – 4 litres approx. $82, 1 litre
Dulux ‘Feminine Fancy’ – 1 litre
Dulux ‘Sweet Aqua’ acrylic exterior paint – 1 litre
Wattyl Solagard White – 4 litres approx. $82, 1 litre
Furnishings:
All furnishing in this cubby were from IKEA:
* Lilac coloured Mammut chairs (H30). Also available in green.
* Svala children’s 3-piece furniture set or the similar LAAT set.
* The Vessla plastic storage crates come in pink, blue and white.
* Pile rugs available in a choice of colours.