


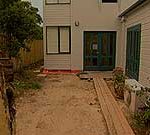


Lisa and Brian Doherty have spent two years restoring their 100 year-old heritage cottage but the outside still looks like a construction zone. A formal garden was definitely needed so the Blitz Team decided to help out.
Mother of one and career woman Lisa Doherty is not someone you can fool easily. Brian had to get Lisa and baby Ailish out of the house for two days while the Blitz team went to work.
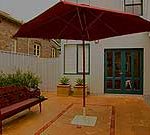
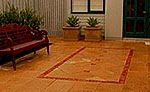
In keeping with the character of the house, landscape designer John Happ devised a paved courtyard garden surrounded by a picket fence and a hedge. The colour burgundy was highlighted with a large market umbrella, a painted bench seat, contrasting paving and foliage colour.
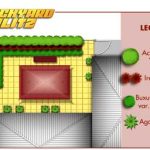
Click to view plan
What we did
We enclosed the back garden with a picket fence and laid pavers. The airconditioning unit was concealed with a timber cover. Lilly pillies, iresine and box were planted in a garden bed while five large pots were filled with agaves. A lovely old bench was repainted burgundy for contrasting garden seating.
Materials
Picket fence and gate: posts (90x90mm), rails (70x45mm), pickets (42x19mm), paint (exterior Silver Grey low sheen acrylic), Rapidset cement (40kg bags). 2 hinges, latch, bolts & nuts (150mm) and picket nails all galvanised. Tools: auger or shovel, circular saw, spirit level, nail gun, electric screwdriver.
Air-conditioner cover: treated pine timber (50x50mm and 50x75mm), paint (exterior ‘Silver Grey’ low sheen acrylic), nails (75mm) and picket nails all galvanised. Tools: circular saw, nail gun.
Paving: Urbanstone sawcut pavers (sandstone colour 400x400x40mm), Urbanstone Classic borders (terracotta colour 100x400x40mm), paving sand, road base, grouting sand, concrete (40kg bag). Tools: vibrating plate compactor, brickies trowel, brick saw, string line, measuring tape, ruler, marker pen.
Garden beds and containers: sandstone-coloured concrete containers (600x600mm), plants (see list below), organic garden mix, potting mix, composted pine bark fines for mulch.
Other: ‘Shelta’ market umbrella (2m2), burgundy paint (for garden seat and to match umbrella).
Adapting this plan to your garden
Make a detailed scale drawing of your backyard (eg 1:100) showing the location of the house and major features then incorporate the desired elements from our makeover. As your garden will be a different size you will need to estimate the amounts of materials you will require. If you wish to include a featured pattern in the paving detail its dimensions carefully.
Note: On your plan show the locations of any services (water pipes, sewerage, power, phone, etc) so you can avoid damaging them during the makeover.
Step-by-step
Getting started: Any rubbish, old structures, paving, weeds, etc should be removed and the site levelled.
Picket fence
Step 1 Paint the posts, cross rails and pickets.
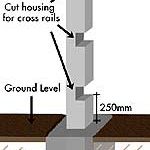
Step 2 Using a chisel and saw cut three notches in the posts for the cross rails (called half house out). For the fence posts we made notches 250mm from the top, 250mm from ground level, and half way between the two (see diagram).
Step 3 Use a string line to mark out the position of the end posts and use an auger or shovel to dig post holes 600mm deep.
Step 4 Place the post in the hole. Use a spirit level to ensure the post is exactly vertical. Half fill the hole with water then tip in a bag of Rapidset cement, watering as you go. The cement should be filled to the top of the hole. Hold the post in position while the cement starts to set (about 4 minutes).
Step 5 Once both end posts are in position run two string lines between them (one just above ground level, the second along the top) to find the side and top levels for the intermediate posts. Repeat step 4 to put these posts in place. Allow the concrete to set before continuing. If using a nail gun, allow concrete to set for at least three hours. If using a normal hammer, wait at least three days.
Step 6 Bolt the cross rails to the posts (use an angle grinder to cut the bolt off flush with the nut) and nail the pickets to the cross rails. Use a spirit level to ensure the first one is vertical then use a picket on its edge for even spacing between each one (ie 19mm). Every five pickets use the spirit level again to check that the pickets are vertical. Blitz Tipz: Use galvanised nails for a long-lasting job and to prevent rust staining.
Step 7 To make the gate, measure the distance between the gate posts and cut two cross rails 10mm shorter than this measurement.Blitz Tipz: Make the gate slightly narrower than the gap between the gate posts to avoid it sticking.
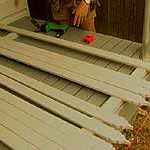
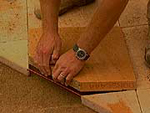
Step 8 Lay the cross rails on a flat surface at the same distance apart as the top and bottom cross rails of the fence. Carefully position the two end pickets for the gate on top of the cross rails, ensuring they are square and screw into place using two screws at each joint (see photo). Blitz Tipz: Use screws to construct the gate as they withstand vibrations and movement better than nails, which will loosen.
Step 9 To get the pickets level, run a string line across the top of the two end pickets. Position the intermediate pickets using a picket on its side to find the spacing and the string line for the level. If you are left with a gap at the end evenly space out the pickets to fill the gap. Screw into place, two screws per joint.
Step 10 Use a piece of cross rail to make a brace for the gate. Angle cut the ends so it extends from the bottom corner on the hinge side to the top corner on the latch side. Screw into position.
Step 11 Attach the hinges to the gate first and then to the gate post. Attach the latch on the other side.
Blitz Tipz: To make the gate child safe attach the latch to the top cross rail. If you want the gate to be accessible to children locate the latch lower down and cut a hand hole through the pickets.
Step 12 Putty the nail holes in the fence pickets and touch up the paint work.
Air-conditioner cover
To conceal an existing air-conditioner we built a four-sided cover that matched the picket fence. To ensure a good airflow the cover has a clearance of 100mm around the unit. It can be easily removed to allow servicing and is supported at the top by a wall bracket.
Step 1 Measure the unit’s dimensions (height, width and distance from the front of the unit to the wall behind).
Step 2 Using 50x50mm treated pine timber cut 3 lengths to the width of the unit plus 200mm, 4 lengths to the distance from the wall to the front plus 100mm and 4 lengths to the height of the unit plus 100mm. The wall bracket is 75x50mm treated pine timber, cut it to the width of the unit plus 100mm.
Step 3 Construct the frame by nailing the lengths of timber together ensuring all corners are square.
Step 4 Cut pickets to the same height as the frame and nail on finding the spacing using a picket on its edge. The top pickets extend from the wall to the front of the unit. Cut, space and nail into position.
Step 5 To find the position of the wall bracket sit the cover in position and mark the internal top and side points of the cover on the wall. Locate the bracket within these points and attach to the wall with nails or screws.
Step 6 Paint the cover and bracket, allow to dry put it into position.
Paving
A paved entertainment area was laid using two colours of pavers to form a diagonally patterned centre area with highlights and a border (see photo opposite).
Step 1 Clear the area to be paved and excavate (excavation depth is the thickness of the paver + 150mm for sand and road base). The paved area should slope away from the house to prevent flooding in heavy rain.
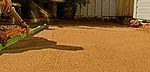
Step 2 Lay road base (approx. 130mm deep) and lightly sprinkle with water. Compact to 100mm with a vibrating plate.
Step 3 Lay approx. 50mm of paving sand over the compacted road base. Use a screed or length of straight timber to level the sand (see photo opposite).
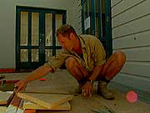
Step 4 Run a string line along the longest straight edge then start laying the pavers following the string line to keep level. Complete the paving except the central patterned feature. Blitz Tipz: Use a brick saw to cut pavers – they can be hired for about $130/day.
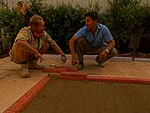
Step 5 To begin the central feature lay the terracotta-coloured border and centre stones. A border paver cut into 100mm squares was used for the centre stones.
Step 6 Lay the diagonal pavers, cutting each to shape as you go.
Step 7 Excavate a 100mm trench around the outside edge of the paved area to make a mortar haunch to contain the sand. Fill with a mortar mix (as per instructions on the bag). Use a brickies trowel to compact the mortar against the side of the pavers taking care not to mound it too high and spoil the look of the paving, allow to set. This step is not necessary if the paving is flush with a solid edge like a wall.
Step 8 Broom grouting sand (fine sand) over the paving to fill the gaps.
Garden beds and containers
If necessary incorporate extra organic garden mix into the existing soil at a 50:50 ratio.
Beds
Plant the garden keeping plants at the same depth as they were in their containers. Water each plant well after planting and spread a 50mm layer of mulch over the entire garden.
Containers
Put containers into their final position. Half-fill each with potting mix, place a plant in the container checking its height. The level of the soil in the top of the pot should be the same in the new container. Finish filling pot, lightly compact and water in then top with mulch.
Our plants
Iresine or bloodleaf (Iresine herbstii), agave (Agave attenuata), lilly pilly (Acmena smithii var.minor), box (Buxus microphylla var. microphylla).
Iresine herbstii
Agave attenuata
Acmena smithii
Buxus microphylla
Cost and availability
We used mature plants to create an instant effect for television. Our total cost of plants and materials was $7806. Considerable savings are possible using smaller plants ($5980). Plants are readily available at nurseries. The large market umbrella by Shelta Australia is available from outdoor furnishing stockists nationwide. Most other materials are available from large hardware stores, landscape suppliers or garden centres. The vibrating plate compactor and most of the other tools required are available for hire.
Acknowledgements:
Design by John Happ, 3rd Dimension Designs, phone: (02) 9744 2658. Construction by the Blitz Team.