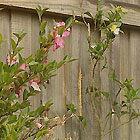
Recently Margaret and Geoff Briggs wrote a letter asking Don to help them with a gardening dilemma. Five years ago they planted over 40 sasanqua camellias (Camellia sasanqua cvs) against their back fence. Some of the plants grew well, but others mysteriously died. Margaret and Geoff talked to horticulturists at various nurseries to try and find out why the sasanquas were dying. They followed all the advice they were given, but the problem remained unsolved.
Site inspection
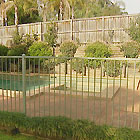
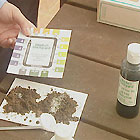
Don visited the Briggs’s property and checked the pH of the soil, the watering system and the area surrounding the garden. Several factors were contributing to the poor performance of the camellias: The camellias were planted in a narrow (30cm or 12″ wide), elevated garden bed. Don explained that this bed would drain rapidly, and the soil would dry out very quickly. The soil pH was 6.5-7, which is perfect for camellias. However, the soil itself was a poor quality, alluvial silt. This type of soil dries out quickly, and then can be difficult to rewet. Although it was raining on the day we visited, the soil collected for the pH test was bone dry.
Masonry surfaces near the camellias included a concrete pathway behind the fence and paving around the swimming pool. These areas would heat up in the sun, heat the garden soil and cook the roots of the camellias. The watering system was not working efficiently. Some of the water was going over the edge and some was hitting the fence. In fact, only about 10% of the water was actually going onto the soil.
Problem solved
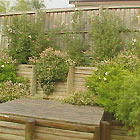
Don concluded that the soil was overheating and the camellias were not getting adequate water, so their roots were cooking. This explains why they were sick, dying or just failing to thrive. He recommended that the sick plants be removed (even if they survived, they would take too long to catch up with the others). He suggested to Margaret that a mulch of horse manure be applied to the bed at a depth of around 75mm (3″). Also that the irrigation system be lowered, and the sprinkler heads changed so that fingers of water flowed onto the camellia bed, instead of misting over the edge or onto the fence. Soils that are hydrophobic (when water runs off the soil instead of soaking in) can be treated with a wetting agent such as Wettasoil or SaturAid, although Don suggested that stabled horse manure mulch may do the job much better.
(Tip: when discussing a gardening problem with staff at your local nursery, remember to give them as much information as possible – perhaps even take along a soil sample. That way you’ll have the best chance of finding an answer to your problem.)
Further information
pH kits can be purchased at nurseries and hardware stores. They are also available from Burke’s Backyard for $16.50 (click on the Burke’s Backyard Shop link above for ordering details).
Horse manure can be obtained from a horse stud or stable, or use cow manure ($53m3 from landscape suppliers).
Wettasoil costs about $9 for 50ml, and SaturAid is priced at around $9 for 50g. Both are available at nurseries and hardware stores.