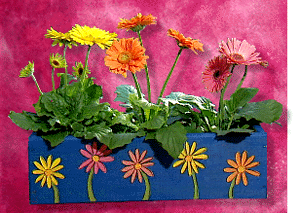
Planter boxes are a great way to display spring plants, flowers or herbs – outdoors and indoors. Tracy Marsh shows how to make a simple wooden planter box and how to decorate it with two easy finishes.
Wooden planter box
The basic planter box can then be decorated with your choice of finish. Treated pine is light, cheap and lasts well, too, the ideal material for planter boxes.
Materials
-
25mm (1″) treated pine cut into the following lengths:
two sides: 150x500mm (6×20″) - two ends: 150x190mm (6×7.5″)
- two bases: 100x480mm (4×19″)
8x35mm (1.5″) 10-gauge countersunk brass screws - 35mm (1.5″) galvanised 14-gauge bullet head nails
- router or hand plane
- sandpaper
Method
- Taking your lengths one at a time, bore and countersink the holes for the screws (always drill holes for soft brass screws).
- Fasten the sides and ends together with the screws, then nail the two base pieces in place.
- Allow a gap of at least 10mm (0.5″) in the centre for drainage.
- Chamfer or round off all the edges and the corners with a router or hand plane to prevent splinters.
- Lightly sand to finish.
Cost and availability
Everything you need for the planter: pine, nails, screws and tools, is available from hardware stores. As a guide, the pine will cost around $2.80 per metre; the screws, around $7.25 for a packet of 25; nails, around $5 for a box of 172; and sandpaper from $1 per sheet. A router is around $225, so maybe think about borrowing or hiring one. A hand plane is around $70.
Painted flower planter box
Materials
-
Deco nArt Patio Paints (Summer Sky Blue, Sunshine Yellow, Geranium Red, Foxglove Pink, Fern Green, Wrought Iron Black and Daisy Cream) or similar colours in any outdoor paint
- base-coating brush
- No. 2 round brush
- white colour pencil
Method
- Base coat with two coats of Summer Sky Blue. Allow to dry thoroughly.
- Transfer a pattern or hand-draw some flowers with the white colour pencil. Fill in the outlines of the flowers petals using the paints mixed to your chosen colours (eg you can make a dark pink by mixing Geranium Red and Daisy Cream).
- Paint the centres of the flowers with Sunshine Yellow mixed with a touch of Geranium Red and the stems with Fern Green. Allow to dry. Add a little more Geranium Red to the Sunshine Yellow to create an orange tone. Using the handle of the brush dipped in the orange colour, add small dots around the yellow centres. Allow to dry and then roughly outline the flowers with Wrought Iron Black to make them stand out against the painted background. Patio Paints are weatherproof and fade resistant, so there is no need to varnish.
Cost and availability
Patio Paints are available from selected craft shops and nurseries and retail at $4.95 for 60mL (2oz) bottles.
Metal punched planter box
A dramatic design can be made by punching holes in aluminium sheeting. There is a pattern on page 88 of the October issue of the Burke’s Backyard magazine. Alternatively, devise your own.
Materials
-
900x1800mm (36×72″) sheet of 0.6mm thick aluminium
- ruler
- black permanent marker
- tin snips
- gardening or protective leather gloves
- construction adhesive such as Max Bond
- 20×2.8mm galvanised nails
- hammer
- masking tape
- tracing paper and plain paper
- 1.5mm nail punch
Method
- Using the ruler and marker, measure and cut out two rectangles 490x130mm (19×5″) and two smaller rectangles 170x130mm (7×5″) from the sheet of aluminium. Neatly cut out all of the pieces with the tin snips, and curve each of the edges for safety purposes. Position the pieces of aluminium one at a time on the outside of the planter. Apply glue to the wood, and nail in place around the outside edge, leaving gaps of approx 20mm (0.8″) between each nail.
- Trace a pattern onto a plain piece of paper and position on top of the aluminium, securing in place with masking tape. Gently punch the design onto the aluminium using the nail punch and hammer. Make indentations consistent in both depth and spacing and try to be careful not to punch through the aluminium. Remove the paper pattern when you have completed your design.
- Repeat the design and technique for the other sides, using the smaller pattern for the ends of the planter box. Check that you have removed all sharp edges, too.
Cost and availability
An aluminium sheet 900x1800mm costs $20 and will make about six planters. Some suppliers will sell smaller offcuts. It is available from Capral Aluminium centres Australia-wide, phone: 1800 424 271 for the one nearest you. A 500g pack of galvanised nails is $5.95, a nail punch is $4.90, and tin snips are $15-$20 from hardware stores.
Further information
For more ideas on decorating your spring planter box see the article by Tracy Marsh in the October 1998 issue of the Burke’s Backyard magazine, pages 84-88.


