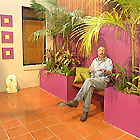
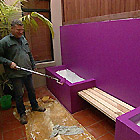
Don made over a messy courtyard for under $500, with really spectacular results. A gaggle of potted plants was replaced with two smart planter boxes and a bench seat, constructed by Backyard Blitz builder, Scott Cam. The existing bangalow palms, bromeliads and cordylines were recycled, but used to greater effect with the new, modern design and colour scheme.
Getting started
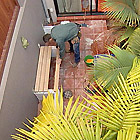
Scott cleared the potted plants out of the way so he could start work on the new planter boxes. He pointed out a problem with efflorescence (a powdery encrustation) on the floor tiles, but said the only thing that can be done is to scrub it off whenever necessary.
Planter boxes
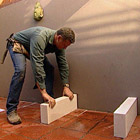
Scott used Hebel blocks to construct the two planter boxes. (Hebel is a lightweight, aerated concrete product that is easy to carve.) The size of the planter boxes was governed by the size of the courtyard, as well as access to the drain and tap. (Tip: Scott used 100mm wide Hebel blocks, but in a larger courtyard you could use blocks that are 200mm wide.)
The blocks were laid using Hebel thin bed adhesive, and every course was attached to the existing wall using brick ties and 6.5mm green plugs. (Tip: wall plugs are colour coded according to size, so make sure you have the right size drill bit to do the job.)
Adding a bench seat
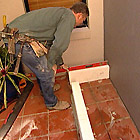
Scott laid dressed hardwood timber straight on top of the second course of blocks. Using a hand plane, he put an arris (bevelled edge) on the corners to give the seat a professional look. The third course of blocks was housed out (cut away) to fit over the timber ends, so the timber appeared to penetrate the blocks.
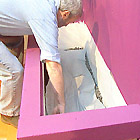
Once all the blocks were laid, the planter boxes were rendered. Weep holes for drainage were drilled in the base, front and sides.
An outdoor furniture stain was applied to the timber bench (Wattle Outdoor Stain ‘Dark Walnut’). The inside of the boxes was waterproofed using a sealer (Durabit waterproof membrane) applied with a broad paint brush (Tip: Scott’s application method was unorthodox but quick – he tipped the sealer into the bottom of the box and used a paint brush to splash it up the sides.)
Finally the planter boxes and the wall were painted with 2 coats of Stone Finish Bold ‘Royal Ribbon’. We chose ‘Royal Ribbon’ from a paint colour chart to match the purple colour in the throat of the bromeliads (Neoregelia carolinae ‘Tricolor’) and on the edge of the cordyline leaves (Cordyline ‘Tricolour).
Filling the planter boxes
Don placed a 100mm (4″) layer of blue metal in the bottom of each planter box to ensure the drainage would be perfect. The blue metal was covered with Geo Tec fabric, to keep the blue metal and potting mix separate.
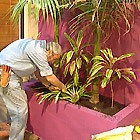
The bromeliads and cordylines were carefully removed from around the base of the potted palms, and set aside for replanting. The palms were removed from their pots ready to move to the planter boxes. (Tip: always get a friend to help. It is very awkward to remove large plants from pots. They are very heavy and you could not only damage the plant but also injure yourself.)
Fresh potting mix was added to the bottom of the planter boxes. The palms were positioned at the correct height, with the fronds facing forward and to the sides. (Tip: don’t plant too low in a pot. Potting mix contains organic material that breaks down, causing the level to drop.) Once Don was happy with the position of the palms, he topped up the potting mix. (Warning: when using potting mix avoid breathing air from the bag, and always follow safety recommendations on the label.) The bromeliads and cordylines were positioned around the base of the palms, with a slight tilt forward so that their colours were visible.
Finishing touches
Don used moss as a mulch on the surface of the potting mix, much like they do with bonsai. Moss can be purchased from florists, but it’s easy to find some around footpaths and edges of roads. Just use a flat bladed knife or paint scraper to lift it up, taking care not to get run over! You’ll find the moss transplants well and will thrive as long as it’s kept moist.
Left over floor tiles were cleaned and painted with ‘Royal Ribbon’, with a contrasting dab (from an $8 sample pot) of ‘Kiwi Fruit’, a lime green colour. Construction adhesive was used to glue the row of tiles to the wall, providing a stylish, decorator touch.
Costs
Hebel Blocks (100mm x 200mm x 600mm) cost about $4 each. Hebel thin bed adhesive, $29 for 20kg. Brick ties, 33c each. Durabit waterproof membrane costs about $70 for 4 litres. Geo Tec fabric, $12 for a 5m roll. Available from hardware stores or landscape suppliers. 20mm blue metal costs about $5.50 per bag, from landscape suppliers. Wattyl’s Outdoor Furniture Stain ‘Dark Walnut’ costs around $18 per litre. Stone Finish Bold ‘Royal Ribbon’ paint costs about $60 for 4 litres from Covered in Paint (02) 9519 0204. Premium potting mix, $7.50 per bag.
Further information
This makeover is featured in the September edition of the Burke’s Backyard Magazine, available at newsagents and supermarkets for $4.95.