
Scott Cam’s weekend assignment was to build a hutch suitable for either guinea pigs (also called cavies) or rabbits. His design, which he described as the ‘Rolls Royce’ version, cost just under $200. It featured a closed-in sleeping area, ventilated exercise run, tough wire mesh to keep predators out and flyscreen to protect the animals from mosquitoes. The top frame was extended at one end to form handles and wheels were attached to the bottom frame at the other end, so the hutch could be easily moved around ‘wheelbarrow-style’.
Materials
- 13 linear metres of 50mm x 50mm dressed pine
- 1 sheet weathershield ply (2400mm x 1200mmm x 12mm)
- 1 x 5m roll galvanised wire mesh (10mm x 10mm squares)
- 5m roll flyscreen
- Nails or wood screws
- Fencing staples
- Shade cloth fasteners
- 2 wheels
- 4 butt hinges
- 2 coach screws
You can measure out this design to whatever length and size you require. Follow these simple steps to build a hutch just like Scotts or if you want to build a smaller version, just change the dimensions to suit.
- Mark and cut the timber members. You need two lengths at 1500mm, two at 1700mm and 12 at 500mm. Once assembled, these will form two rectangular frames.
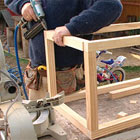
- To build one frame, use one 1500mm length and one 1700mm length, attached together with three of the 500mm spacers. Attach the 500mm spacers at the ends of the frame, using the 1500mm length as your guide. This provides a 200mm length of timber at the end that will form a handle, just like a wheelbarrow. From the end opposite to the handles, measure 1100mm along the frame and attach a third spacer at this point. This spacer acts as a divider between the larger, exposed area of the hutch and the smaller, enclosed area. Scott used a nail gun to assemble the hutch, otherwise, you can pre-drill then screw the timber members together.
- Repeat step two to build the second frame. Once joined together, these panels will make the two sides of the hutch.
- Now you need to attach the two panels together. At each point where the existing spacers are attached on one frame, attach an additional spacer at right angles then attach the two frames together, forming a rectangular box (make sure that the handles are both at the same end and opposite each other).
- Mark and cut three squares of ply to fit around the three sides of the smaller area to be enclosed. Cut two square corners out of one of these pieces to allow for the handles. Nail these squares to the frame, leaving the top and bottom exposed.
- To build the large door, measure and cut two lengths of timber at around 1390mm and two lengths at around 390mm. These lengths allow for the door to be assembled and to fit in the top of the hutch frame with about a 5mm gap for ease of movement. Measure your frame and adjust the lengths of your cuts to suit.
- The door for the smaller area of the hutch is made from ply. Cut a square to fit almost flush inside the frame (two sides around 315mm and two sides around 490mm).
- Now cut the galvanised wire mesh to size for each panel – bottom and end. Where possible use one continuous length to wrap around the panels. Use fencing staples to attach the mesh to the frame. Do likewise for the larger door.
- Before attaching the doors to the frame with butt hinges, slip each of the doors one at a time inside the frame until it is flush with the top of the frame. On the underside opposite to where the hinges will be screwed, mark a line on the frame where the underside of the door would sit. Now remove the door and affix a piece of off-cut to the frame where this mark is. This acts as a jamb for the door to rest on so it doesn’t fall through the gap.
- Screw two butt hinges to each door and then attach the doors to the frame.
- Now repeat step six, using the fly screen. The mesh must be used in conjunction with the fly screen to provide strong security and also keep out insects. Attach the fly screen with shade cloth fasteners.
- Attach the two wheels to one end of the hutch, on either side.
- With the remaining left-over ply, cut a cover for the hutch with about a 100mm lip all around. This will keep the sun and rain off the animals.
Design hints
- A hutch to accommodate two cavies should be a minimum of 90cm x 50cm. It is very important not to overcrowd the hutch, so if you want to keep more than two cavies, allow a minimum of 30cm square for each additional animal.
- The hutch should have a ventilated wire section and a covered section. The covered section should be about 1/3 – 1/4 of the total length of the hutch.
- Use untreated, dressed timber (treated timber could harm the cavies) and strong square wire, with squares no wider than 10mm. (Scott’s tip: use tin snips to cut the wire to size.) Breeders recommend painting the wood with paving paint inside and out.
- Each section of the hutch should have a lid that lifts up from the top. This makes cleaning easy and minimises disturbance for the cavies. Test the hinges before attaching them to ensure they are aligned correctly.
- The hutch should be elevated to allow drainage of urine and faeces.
- A separate piece of weatherproof material should be placed over the top of the entire hutch to protect the cavies from the elements. This piece can be removed or added, depending on weather conditions.

Further information
Commercial cavy hutches are available from pet shops and will cost from $50 to $200. Aviation tin snips range in price from $5 to $45.
Nail guns are available for hire for around $30 a day.