Creating your own backyard frog pond is a great weekend DIY project, and you can make it as big or as small as you have room to croak!
Building a backyard frog pond isn’t rocket science, and it is great fun. You can use any type of container that holds water: a pre-made water feature, a child’s plastic wading pond, concrete laundry tub, half wine barrel, glazed water bowl, or a hole lined with a Butyl pond liner, set into a low spot in the garden which looks good and creates a damper, safer environment for the frogs.
Selecting the site for the frog pond is the first step. If you are using a pre-fabricated pond find a spot where there are plants nearby to provide shade and a place for the frogs to live.
Here’s a fact: frogs won’t live in the pond most of the time. Their babies, the tadpoles, will live there. The adult frogs use ponds to breed and lay their spawn, but spend the rest of the time around the edge of the pond, among the plants. Here’s how to build your own:
1. Our DIY pond uses a butyl pond liner (for the size of hole you are planning to dig, buy about twice that area in butyl rubber; 3m will cost from $30-$57, depending on the quality). Dig the hole, then remove any rocks or roots which may pierce the liner. Use some of the excavated material to build up and level the edges of the pond.
2. Line the hole with 50mm of damp sand and smooth it off with a wooden float.
3. Place the butyl liner in the hole (we used a sheet 3m x 3m, but the liner should always extend over the hole by at least 300mm all-round). We trimmed gross excess, but left plenty of fold over and placed a series of rocks on top of the folds to camouflage the liner.
4. After trimming it all to size, fill the pond with water and only after that trim off any excess liner.
5. Place rocks and logs around the edge of the pond. These anchor the liner and create natural spaces for frogs to live in.
Put pebbles in gaps between the rocks, to help with the transition from the water to the rocks and give a more naturalistic look.
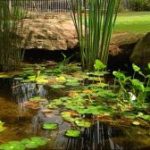
6. Place the plants in their pots in the pond, with the shorter floating types in the shallow end and the taller ones in the deep end. We used nardoo, mat rush and umbrella papyrus. Your local aquatic plant specialist can advise on plants suited to your climate.
Don’s bonus tips
Friendly fish: fish are essential if you want to keep mozzies at bay. We chose native crimson-spotted rainbow fish ($8.95 each, or five for $40) as they eat the mosquito wrigglers but don’t go after the tadpoles. Find out from your local aquarium or specialist pond shop which species thrive in your area. However, no matter what, don’t use mosquito fish as these will eat the tadpoles.
Setting up your pond:
Glazed water bowl
1. Level a spot in the garden and put some sand underneath, to give a foundation for the pot to sit on. Check the sand to make sure it is level, using a spirit level.