

Fashionable Fabric Bags
This trendy fabric bag won’t break the bank, but it will rival any designer creation for style and panache. Choose any two fabrics that look great together. One will make most of the bag, the other will be the lining and the decorative panel. Rita chose blue velvet for the outside fabric, with a complementary salmon fabric for the lining. The step by step instructions below include an optional inside pocket (not shown in our segment) and braid and pearl bead decorations.
You will need
- 2 different types of thick fabric, about 0.5 metres of each.
- braid (optional)
- beads (optional)
- pins
- sewing machine
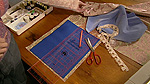
- a simple paper template 28 x 35cm (see below)
Method
1. Cut out a paper bag template 28 x 35cm. Place it over the fabric and cut two of each – blue for the main bag, salmon for the lining.
2. Fold the bag template in half horizontally, to create a rectangle 35 x 14cm. Place it over the fabric and cut out two pieces of the lining fabric, for the outside panel.
3. Fold the bag template in half vertically, to create a rectangle 28 x 17.5cm, and cut out a piece of the lining fabric to make the inside pocket.
4. Cut two strips 6cm wide by 60cm long, in both fabrics, to make shortish handles. Cut them longer if you prefer.
5. To make the inside pocket: fold it in half, right side in, and sew around the edge, leaving just a small gap. Push the fabric through the hole until it’s the right way out, then sew up the gap.
6. Place pocket 4cm from the top of the lining fabric piece, pin it in place then sew the sides and bottom so the top is left open.
7. Lay the pocketed lining piece on top of the unpocketed lining piece, right sides in, and pin them together. Sew together at both sides and bottom. Set aside for later.
8. With the two pieces of outside fabric (blue) and the two outside panel pieces (salmon), pin panel fabric onto the outside fabric 2cm from the top, right side out. Make sure to turn in the panel fabric edges and sew together. At this stage, you can trim the bag with the optional extras, detailed below.
9. Pin together, right side in, the two outside fabric pieces then sew the sides and bottom.
10. Turn in and iron the strap edges then place one blue strap (the outside fabric) with one salmon strap (the lining fabric), pin, then sew together. Do the same again to make the second strap.
11. Tuck in the seams at the top of the bag and pin straps. Tuck the lining into the bag, and tuck in the seam of the lining, then sew straps, lining and outer shell together along this top edge.
Extras
For an original look, use matching braid and sew this over where the trim fabric meets the outside fabric. You can do it on both sides or just one, as Rita did. You will need 0.4 metres of braid trim for one side, 0.8 metres if you do both sides. Stitch something extra special, like pearl beads, in a random fashion below the braid onto the outside fabric.
Costs
All up cost for this bag is just $18, depending on the fabric and trims used.
Further reading
Rita Hill has written an article on making fabric bags. It is featured in the June 2000 edition of the Burke’s Backyard Magazine.