

Easy Drawing
Have you ever been asked by your children to draw a person or an animal, only to have your drawing skills let you down? Don’t worry, using Rita Hill’s step by step instructions even the most ordinary artist can produce a masterpiece, and save face with the kids!
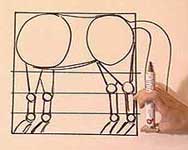
Drawing a horse
1. Using a pencil (so the guidelines can be rubbed out) draw a square and divide it horizontally into two segments with line A.
2. Divide the bottom half into thirds, with lines B & C. (The horse’s body will be in the top half, its legs in the bottom half.)
3. Draw two circles (1 & 2) in the top half. Circle 1 is slightly larger than circle 2.
4. Draw four small circles (3) around line B, and four small circles (4) around line C. These are the joints in the horse’s legs.
5. To create the legs, connect the circles with lines to create all four legs, as shown in the diagram.
6. Draw the hooves at the bottom, making sure to angle them forward slightly.
7. Using slightly curved lines, connect the big circles together to create the horse’s stomach and back. Then draw the neck. Its length (line D) is about the same size as the diameter of circle 2 in the horse’s body.
8. The head length (line E) is about the same as the distance from the neck to circle 1. Draw line E (for the head). Make sure it is at slightly less than a right angle (back towards the neck), down from the top of line D.
9. The head is made up of a diamond (5) and two circles (6) for the cheek and muzzle. Then add two triangles (7) for the ears and pop on a lovely, curved tail.
10. Now that you have the basics of your horse done, go over the framework with the pencil. Draw in the mane and forelock and mark the eye at the point where the diamond meets the circle. When you’re happy with the result, go over the outline with a permanent marker and rub out the pencil marks.
Drawing a superhero
1. Using the pencil again, draw a rectangle divided into eight even sections (with 7 lines). This ensures correct proportions.
2. The head fits into the top rectangle section (line 1), the nipple at line 2, the crotch at line 4 and the knee at line 6.
3. Draw an oval in section 1 for the head, then a big circle in sections 2 and 3 to make the chest.
4.The limbs are a series of ovals that define the muscles. The mid section is narrow and straight. Now, outline the figure.
5.To do the head, divide it in half with a horizontal line then draw more lines under that, equal distances apart.
6. The top line marks the eyes, the next line the nostrils, and the third line is the mouth.
7. Add accessories such as helmet, boots, gloves and cape. When you’re happy with the outline, go over it with a marker pen and rub out any pencil marks.
Further information
Rita Hill’s article ‘How to Draw’ is featured in the July 2000 edition of the Burke’s Backyard magazine