

Family Tree
A shoe box in the bottom of the cupboard is no place for your precious family photographs – why not use them to put together your own family tree? It’s fun, and it’s really easy if you use the special fold-out family tree chart in the June edition of the Burke’s Backyard Magazine. Rita Hill demonstrated how to fill the chart in, step by step.
Your family tree
1. Carefully tear the family tree chart out of the magazine, and give it a quick press with a warm iron to flatten out the fold down the centre. Before you start work it’s a good idea to photocopy the chart, particularly if you have a large family. (Tip: colour photocopies are most suitable because they match the original.)
2. Your old photographs are too precious to cut up, so photocopy them too. The copies can be made in colour, sepia or black and white, in whatever size you need to fit into the chart.
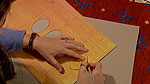
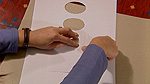
3. Carefully cut out the windows in the chart, using a scalpel or scissors. Run over the edge of the window with a red pen to camouflage any of the white edges that are showing.
4. Cut out the photocopies of your family photographs, making them slightly bigger than the windows. Position the photos in the windows in order of generations, then sticky tape them down.
5. Write in the details of births, deaths and marriages.
6. Frame the chart and hang it on the wall.
Further information
The June 2000 edition of the Burke’s Backyard Magazine. As well as the fold-out family tree chart, expert genealogist Janet Reakes has written an article with practical advice on tracing your family tree.