
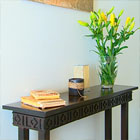


Scott Cam showed that he is up there with the best when it comes to style! This simple sideboard is cheap to make (around $100), yet it’s sure to add a touch of class to any home.
Tools
- saw
- saw horse
- power drill
- cordless drill
- Phillips head screwdriver bit
- combination square
- level
- extension lead
- screwdrivers
- paint brushes
- sandpaper
- rags
- tape measure
Materials
To save time, ask the timber yard to pre-cut the pine to length. Prices are for treated pine (you can use untreated) and may vary from yard to yard. Make sure the legs are all cut to precise equal length.
Timber
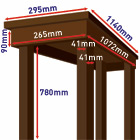
Tabletop
1 x 19mm x 295mm x 1140mm pine @ $12.50/m
Legs
4 x 41mm x 41mm x 780mm pine @ $4.12/m
Braces
2 x 19mm x 90mm x 1072mm pine @ $2.33/m
2 x 19mm x 90mm x 265mm pine @ $2.33/m
Fixings
2 x 4 piece pkt of Zenith 50mm solid steel brackets @ $5.25/pkt (screws included)
1 x 50 piece pkt 6gm 25mm brass wood screws with countersunk head @ $4.50/pkt
1 x tube PVA glue $2-$10
1 x 50 piece pack 10mm tacking nails @ $2
Finishings
2 x sheets fine sandpaper @ $2
1 x 200ml ‘Wenga’ Wattyl Wood Gel @ $10.84
1 x 2 piece pkt 1170mm moulding @ $20 – we used Deco Dimension, ‘Egypt’ style, from Bunnings
Hardware
1 x 500ml Gloss Wattyl Estapol @ $12.50
1 x pkt clean rags @ $6
1 x paint brush @ $5
Assembly
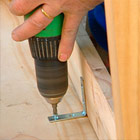
- Select which side you prefer to be the underside of your tabletop. On this side, measure 15mm in from each edge of the tabletop, to create a lip. At this measured point, place each of the pre-cut braces and secure the braces to the tabletop with the 50mm brackets, attaching two brackets per brace.
- Screw the braces together using 2 x 25mm wood screws at each end.
- Place a table leg in each corner inside the braces and attach to the braces with 2 x 50mm wood screws per leg. (Tip: when selecting the place to affix each screw, make sure not to align it directly with the screws already in the braces, otherwise they may intersect and stop the leg screws from finishing flush.)
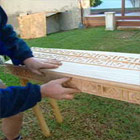
- Lightly sand back the surfaces to be stained. (Tip: always sand along the grain.) Following the manufacturer’s directions, stain with Wattyl Wood Gel using a rag or cloth. (Tip: stain the moulding now too, it is more difficult to stain after attaching it to the braces.)
- Once the stain is dry, attach the moulding around the outside of the rails with the PVA and/or the 10mm tacking braces.
- Following the manufacturer’s directions, apply the Wattyl Estapol.